
If you are only looking for instructions on how to install the pannier system on your bike, scroll down until you find the INSTRUCTIONS section. If you are bored at the office and fancy reading the whole story, read on.
This Polish pannier system costs about 200€ less than the equivalent offering from Touratech and includes a right pannier with an exhaust cut, something that the German manufacturer seems to refuse to make for any bike other than BMWs. They are mostly (more on that later) a match for the German quality, so taking into account the added benefit of the exhaust cut, where does the difference in price come from?

Instructions, apparently. The Poles do not include a single piece of instructions for their products. You get the panniers, the support hoops, a few metal tubes bent in different shapes and a bag of bolts, nuts, washers and spacers and are left to do your best to guess how it all fits together onto your bike. Not that Holan is trying to save the Amazon by eliminating the need for printed instructions, mind you, there is not even a PDF on their website. Really Holan? Really? Is it that hard?

Better be a Meccano fan, then.
Holan panniers usually come with the mounting points already fitted at no extra cost, which is another advantage over Touratech, but in my case I got a pair that the Spanish dealer had in stock to avoid the long wait for the panniers to be shipped from Poland, and I was aware that I would have to fit the mountings myself. That was not a problem, though, as I had experience on my old Touratech panniers, the only drawback was that it is a time consuming process.
The first racks that Holan made did not have any mounting points to the back of the subframe to avoid the need to drill through the fender, but they flexed too much and the design was modified to include an extra mounting point. This single picture of the new rack had made its way to the web, but that was all the information I had:
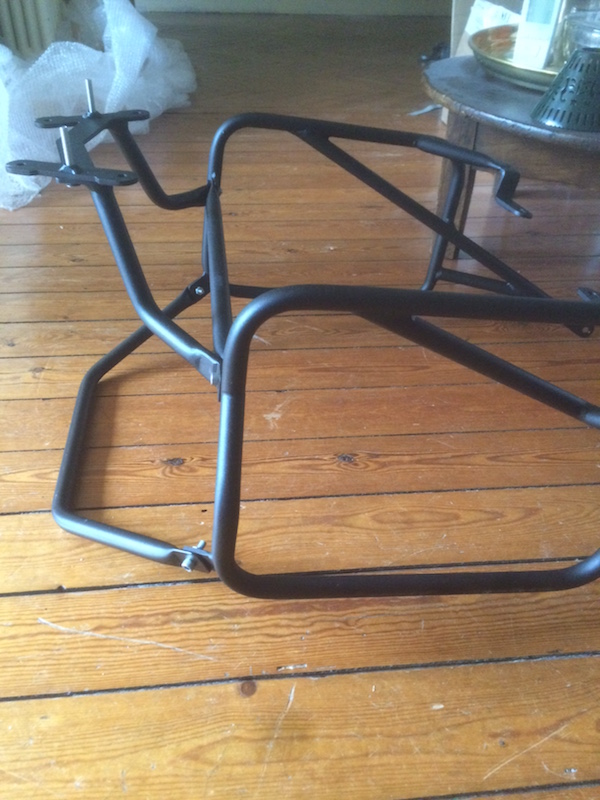
I assumed that it would require the same process as the Touratech, GIVI and Globescout systems, drilling a couple of holes through the rear fender to attach it to the end of the subframe. Two things did not look quite right, though.
First, looking at the picture above, those two bolts seemed to be too far back to fit through the fender at the end of the subframe, they were more like under the rear light or license plate.
Second, with the bits and pieces already scattered in front of me, the H-shaped plate where those bolts mount was too wide and too flat to fit under the fender, which has a pronounced inverted U shape. Maybe it fit on the other side of it, under the seat?
I decided to loosely mount the hoops on the attachment points on the passenger footpegs and the front of the subframe to try to figure out how the new parts fit together, and after a few minutes of fiddling it dawned on me. They attach under the rear luggage rack, not the subframe! So the good news is, the Holan system still requires no drilling.

From that moment on, it was only a matter of figuring out where all the bolts, nuts, washers and spacers went. Here is how to fit it:
INSTRUCTIONS
Remove the seat. It is not necessary to remove the pillion seat, although it is advisable to avoid getting it dirty by accident, particularly if you have the red one.
Remove the two bolts that hold the luggage rack and passenger handles to the subframe that are closer to the front of the bike. The Holan rack attaches directly to these points, a solution which I prefer to them hanging from the existing points for the OEM luggage.

Remove the passenger footpegs. You will need to completely remove them, as one bolt will hold the rack mounting point and the other requires a spacer.
If you have a top case or luggage rack, you will also need to remove it (not my case yet).
Important! If your panniers come with the mounting system already fitted, you can start installing the rack on the bike now. If you need to drill the holes to mount them, do not mount it on the bike yet, you need the hoops to take measurements to mark the drilling points on the panniers. I explain this process further below, so read that now if you need to, then come back here once your mounting system is fitted to the panniers and you are ready to fit the rack on the bike.
The easiest way to make sure that everything lines up as it should before you start tightening bolts is to mount all the parts onto the bike and fit all the bolts and nuts loosely, then start progressively tightening them. More often than not, something will not line up and it will require pulling, pushing or bending.
In my case, and at least one other member of the Spanish forum, the mounting point to the subframe for the exhaust side hoop required extreme force to line up with the hole. Not wanting the bolt’s thread to get damaged later, I put it on a bench vise and bent the mounting point slightly backwards with a precision correction tool (also known as ‘hammer’). After that everthing fit without any problems.
The lower mounting point attaches to the upper bolt of the passenger footpeg. Because this will cause the footpeg to be slightly further outwards than before, you need to use the provided spacers in the lower bolt. Don’t remove the washers that come with the footpegs.

At the back, mount the lower bracing bar that connects the bottom of the hoops together with a washer on both sides of the bolt. The side with the more open angle is the exhaust side.

To fit the extra mounting point under the luggage rack you need to use the eight special spacers. Put four on the holes on the luggage rack from the top (narrow side down) and drop the long Allen bolts with the rounded head into them.

Now comes the tricky part – you need to fit the other four washers (wide side up) up the bolts, fit the H plate without them falling (and with the welded threads facing up) and start screwing the self locking nuts. Do not tighten them completely.


To finish, attach the L shaped mountings from the top of the hops to the H plate under the luggage rack.

They fit with the angle facing to the ground so that they clear the indicators. In my case, Holan had not included the two bolts needed to fit them to the H plate, so I had to find a pair from my personal stock.

The only thing left to do now is to go around the rack and progressively tighten all the bolts and nuts. All the nuts provided are self locking, but it is always advisable to check everything has settled in properly after a few days riding and to put a drop of thread locking glue in them to make sure that nothing comes loose.
FITTING THE PANNIER MOUNTS
For those of you unlucky enough to get the panniers without their mounts already fitted, here is how to do it.
With the old Touratech Zega panniers, or any others that do not have rounded or cut corners, nor an exhaust cut, it was possible to play a bit with the mounting points to find the best position – a bit further back, or closer to the front, higher or lower… in order to do this properly the best method was to mount the racks on the bike, check exactly where you wanted them (usually with a passenger) and then remove the panniers to use the hoops to mark the exact drilling points with the panniers lying on their side on the floor. In this case there is not much room for lateral movement, and you can’t choose the height as that is determined by the exhaust cut, so you can take all the measurements to drill the holes without the need to mount the rack on the bike before.
Take the pannier with the exhaust cut, lay it on its side, place the hoop on it and measure the distance across to both edges.

There is a bit of room to mount it slightly forward or backward, but not much, and mounting it in the middle means that you minimize the risk of making a mistake then transferring these measurements to the other pannier (see my previous post about that) and that you will be able to swap left and right if in the future you buy a bike with the exhaust on the other side (providing Holan makes a rack for that one, that is).
Then measure the distance from the top of the hoop to the lid. And write all these numbers down.

With the hoop in the exact position you want, place the plastic pucks on their correct position on the inside of the hoop (you will need a friend to hold it down in position for you to make sure it does not move a millimeter, or alternatively, put some weight on it). Take a long thin pencil or even better, a metal punch, and mark the position of holes of the plastic pucks on the pannier.

Remove everything and drill the holes (5mm for the small bolts, 8mm for the big ones).

Clean the metal shavings with a bigger diameter drill and mount everything in the following order: from the inside – the reinforcement plates (small) and the bolts; from the outside – the reinforcement plates (long) the plastic pucks, the metal plates (at the bottom) and the rotating locking plates (at the top). Make sure the 8mm holes at the top are wide enough for the rotating locking plates to turn freely.

In my case, I had to add a spacer for the locking knobs inside the pannier, as they are too close to the head of the small bolt, and no spacers were included in the kit.

The hoops have a small metal bump onto which the rotating locking plate fits to make sure they do not turn as you are tightening them. One of them did not fit (the cut on the plate seemed to be too short) so I had to lengthen the cut a bit.

All in all, two bolts and four spacers missing, a mounting point on the rack that required some “aligning”, a cut on a locking plate that needed lengthening and no instructions. If you like DIY, have access to tools and want panniers with an exhaust cut, these are a very good choice. For 200€ more, and if you forego the exhaust cut, the Touratech ones come with instructions. I don’t know about the latest models, but my old Zega ones (first generation) still required drilling (more holes, actually) and the rack also needed bending. No missing bolts or spacers, though. If you want the full GSA look, try Globescout. Instructions, anodized ,no drilling and supposedly excellent quality. They are 300€ more. Oh, and Holan prices include shipping.

Hi there,
regarding the mounting point on the rear pegs, i fitted the distance washer and the frame in the outer part of the peg. It is not good looking but it’s the only way to properly tighten the screws and have the peg frame aligned with the bike frame. I tried all the possibilities with washers and distance washer behind the peg frame but I did not find a solution to have a “plain” mounting.
Also due to the fact that rear part of the peg frame is not flat.
Hi, Just finished installing the same Panniers on my AT. I’m located in Switzerland and ordered from a german shop who imports Holan Gear. The Installation went much smoother thanks to your guidelines, thank you. Besides that, i had exactly the same experience. No installation manual, 2 bolts missing, and the misalignment on the right side pegs. So seems to be a widespread manufacturing issue.. I would buy them again though. Cheers
Thanks for your thoughtful and detailed instructions. They saved me an enormous amount of time.
Just got mine. No installation instructions either. The parts seem good. I have had Holan racks before and they performed well so ordered a new set. Plus 1 for product. Minus lots for lack of communication from Holan and no instruction manual! I have yet to see if I am missing the 2 bolts. Thank you for your write up.