Quick jumps to:
– What digital alarm clocks before it were like
– Why is the LM8560 so costs effective? The trick, how it works
– Typical issues
– Its weakness is also its strength
– Its “hidden” functions
– Some unwanted behaviors
– That evil beep beep!
– Limitations of use
– Make a quartz clock / DC supply clock with the LM8560
– Operating modes
– Its relatives and predecessors
– The Duplex display. A not versatile but clever solution
– Not the best chip for electronics hobbyists
– My alarm clocks
– My first clock radio in 1986, by Majestic
– Sony ICF-C102
– Sony ICF-C290
– Thomson CR61, my final clock radio
– The modern clock radios
– LM8560 manufacturers list and alternative ICs
Almost everybody has had one, or even has still one of it at home. Almost everybody who had it, keept it in his/her immediate proximity while sleeping…
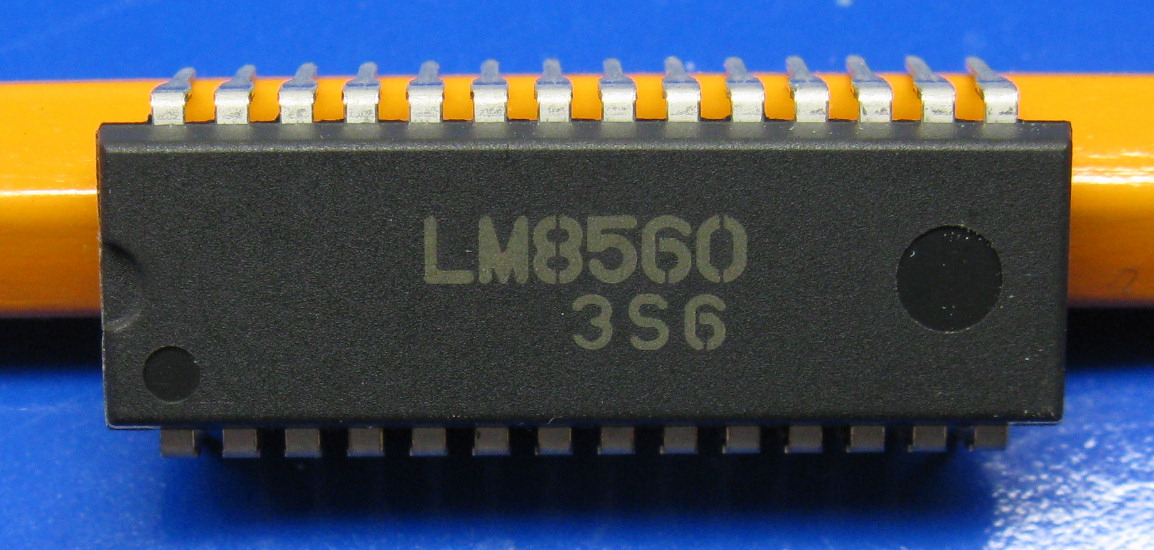
The LM8560 is the integrated circuit (IC), which was built in almost all the digital alarm clocks and clock radios, with numeric LED display, that have been produced from around 1985, or even the first 1980 years, up to the 2010 years. A very few and last models are still produced in year 2023. But they are fading out.
Alarm clocks and clock radios with numeric LED displays are disappearing today, being replaced by LCD displays, merely because of trend reasons. Furthermore, the red color for the LED displays is also becoming rare, because of trend reasons as well, being replaced by green, or worse, by blue LEDs.
It doesn’t matter whether it was a major brand, like Sony or a no-name brand sold for 10€ at a discounter market, the brain of the alarm clock was almost always the same. The now ‘obsolete’ but timeless LM8560, originally made by the Japanese Sanyo.
The LM8560 is a low power consumption MOS integrated circuit.
The letters before the number 8560 printed on the IC vary depending by the chip manufacturer. “LM” were used by the original manufacturer Sanyo, which was also the inventor of the chip. The letters after the number, if present, are of virtually no importance. Today some illegal clones made by Chinese manufacturers are labeled with “LM”, but they are not the original by Sanyo and I have no idea about the quality and durability of these chips.
The TMS3450NL was the clone made by Texas Instruments.
The modern alarm clocks with LED display are made with micro controller chips. I will show it later.
– Why am I talking here about this ‘obsolete’ chip?
Because it had its debut in the early or mid 1980s and it is one of the few things from those years that has survived intact to this day, still working. This chip played an important role in the falling of price of the digital alarm clocks.
Although it is now considered an obsolete chip, its modern successors based on a programmed micro controller, built in modern budged clock radios, do not offer much more functionalities. Sanyo and other licensed occidental manufacturers have discontinued the production of the LM8560, but it is still produced today by some Chinese chip manufacturers, under license of Sanyo. It is also copied by not authorized Chinese manufactures, of unknown quality. Therefore the LM8560 has earned a place in the list of the longest-living chips, still being produced the same as it was, for about 40 years, today in 2023. I don’t know the year of its first introduction, but it might be around 1985. If anybody has any info about this, please let me know.
In some alarm clocks with LED display, also a slightly more updated version of the LM8560 was used, the LM8562 or an equivalent chip. It offered the possibility to set 2 different alarm times, and it had “Slow”, “Fast” buttons to set the time.
– What digital alarm clocks before it were like
Until the late 1970s and early 1980s, digital alarm clocks were somewhat more challenging cost devices than today. “Digital” doesn’t mean necessarily “electronic”. It means that the time is show actively by digits and not by hands.
The most primitive models did not have lighting digits. The numbers were printed on thin plastic plates, which were flipped by the slow rotation of a step by step electric motor.
re LEDs became more affordable, the alarm clocks with luminous digits were made using fluorescent displays, like the displays of many DVD-Blu Ray players of today, or many Hi-Fi sets. Usually the fluorescent display used in alarm clocks had a light greenish color. Fluorescent displays were, and are, much more expensive to build and complicate to drive than LEDs. In addition, alarm clocks counted the time mostly using a quartz crystal. Often the word “Quartz” was printed proudly on the case of the clock. The control circuit of the display and the quartz circuit involved some construction complexity and a significant number of components. The lower price for a clock radio in the early 1980s was not cheap. Let’s say about €70 today. The size of the alarm clocks was also considerably larger.
Clocks of this kind never appealed me. They tastes too much “mechanical” and rudimentary, whereas I like electronic since ever.
Before LEDs became more affordable, the alarm clocks with luminous digits were made using fluorescent displays, like the displays of many DVD-Blu Ray players of today, or many Hi-Fi sets. Usually the fluorescent display used in alarm clocks had a light greenish color. Fluorescent displays were, and are, much more expensive to build and complicate to drive than LEDs. In addition, alarm clocks counted the time mostly using a quartz crystal. Often the word “Quartz” was printed proudly on the case of the clock. The control circuit of the display and the quartz circuit involved some construction complexity and a significant number of components. The lower price for a clock radio in the early 1980s was not cheap. Let’s say about €70 today. The size of the alarm clocks was also considerably larger.
With the progress of electronics and the decreasing price of LEDs, the LM8560 came. A less than half a Euro chip (adjusted to today inflation), that contains all the functions you need to build a basic digital alarm clock. You just need some LEDs to arrange the display and very few external components around it. The radio is to be added separately, if needed.
The arrival of the LM8560 made possible to build digital alarm clocks for half the price, or less, of those with fluorescent display and quartz. The manufacturing became so much cheaper and simplified, that for the first time clock radios were even being offered as prizes by some supermarkets for the collection of their purchase points.
– Why is the LM8560 so cost effective? The trick, how it works
The LM8560 is not a programmed micro controller. In the ’80s programmable micro controllers were no cheap ware at all.
The LM8560 is a logic chip, made of fixed integrated components, as logical ports, flip-flop circuits, comparators, operational amplifiers, etc. All them fitted in the same chip and connected among each others in order to execute the desired functions. The functions can’t be changed, without to change physically the content of the chip.
Being not a programmed micro controller, the LM8560 is also a virtually eternal component. Many modern micro controllers incorporate a flash memory to store the software that let the controller work and execute the desired functions. Flash memories retain their content not for an unlimited lifespan. It may be several decades, but before or later it comes the day when they begin to lose their content, and the micro controller stops to work. This can’t happen to LM8560, because it doesn’t contain any flash memory.
An electronic clock consists essentially of 2 different parts. A frequency generator, that generates a stable frequency and one part counts the waves coming from the generated frequency. Counting the waves that pass, the passing of seconds is counted. In quartz watches, the frequency generator is a quartz oscillator. In addition, if you want obtain a very good accuracy in quartz clocks, it is necessary to add some components to make the quartz frequency adjustable. A calibration process has to be performed individually during the manufacturing of each clock. This increases the time and cost for the workers needed for the manufacturing.
The LM8560 does not need any calibration operation. As soon as it is assembled, it is ready to use with no mistakes! It contains only the counter and the logic for to manage the alarm and clock functions. It has no frequency generator.
The LM8560 simply counts the waves coming from the AC power outlet. It can be 50 Hz or 60 Hz, depending on the Countries. In my case it is 50 Hz. It means that 50 waves per second come in. Every 50 counted waves, one second of time is counted. Every 60 counted seconds the minute digits are increased by one. Every 60 minutes the hour digits are increased by one.
In addition to the counter and the logic for the clock/alarm functions, the LM8560 contains the circuit to drive directly the LED display.
The alarm clocks with LCD displays, even those from the ’80s years, are instead quartz-based, like the wristwatches, and they use different components.
An important function integrated in the LM8560 is the power backup system. It keeps the time running in the event of a power blackout. It is made switching the power supply of the chip to a 9V battery. During the blackout, a local simple RC (resistance-capacitor) oscillator is used. The frequency generated by the RC oscillator is very approximated, up to +/-10% error. It means that while the AC power is missing, the clock can run forwards or backwards up to 1 minute every 10 minutes! If the AC power is missing for a long time, it is normal to find the time several minutes shifted. It seems that the LM8560 was the first IC clock to incorporate this important function, making it a very smart and convenient chip. Only the resistance and the capacitor for the backup oscillator, are required to be mounted externally to the chip.
– Typical Issues of clocks with the LM8560
You might experience that some clocks with the LM8560 may run too fast in comparison with other clocks, also with the LM8560. Cheap models are more subjected to this fault. It is due to the missing of proper filtering on the 50/60Hz input signal for the LM8560. Spikes and disturbs present in the AC line can be wrongly counted as clock waves by the chip. Just add a 0,1 or 01,01 µF ceramic capacitor in parallel to each rectifier diode of the power supply of the clock, and one between the pin 25 (50/60Hz input) and pin 15 (VSS) of the LM8560.
If power blackouts are frequent in your zone and your alarm clock runs excessively fast or too slow while there is no AC power, you can fix it easy. Simply adjust with a trimmer the value of the resistor that is in parallel to the capacitor of the backup oscillator (see the datasheet), in order to obtain a frequency of exact 900 Hz, or adjust it simply by trying. You can roughly calculate the required Ohm variation in %, observing how many seconds the time gets shifted in 1 or few minutes without power.
– Its weakness is also its strength
As mentioned before, the LM8560 merely counts the waves of the AC power. But there is nothing that lets it know whether the waves are coming exactly 50 times per second or not. If 100 waves would come per second, the clock would run forwards half an hour every hour!
Normally, the frequency of the AC power in our sockets has a tolerance of +/- 2%. It means that the clock could run forward or backwards up to 14 minutes a day! Far away from the constancy of a quartz oscillator. Therefore, this would make the frequency of the AC power unsuitable as source to drive a clock, since very small variations in the frequency result in large hourly variations.
Why doesn’t this happen instead? Frequency variations are caused by small random variations in the big generators in the power plants. Sometimes the frequency is a little higher than the standard value by a small amount, sometimes it is a little lower. These variations will never be the exactly equal between each other, so the errors cancel among each other and roughly the average frequency remains constant, very close to its standard value.
Furthermore, in power plants the frequency is constantly monitored and kept under control. When it is detected that over a certain time, the average frequency has been higher by a certain %, the frequency is then lowered by the same % for the same time, so the overall balance is brought back to equal.
In fact, if you compare second accurately, the time of an alarm clock with the LM8560 to a reference clock, like a radio-controlled clock, you will find that the time difference is not constant. It varies day by day, and even during the same day. Sometimes you will find that the alarm clock is 30 seconds, or max 1-2 minutes in advance. Meanwhile some days you will find it 1-2 minutes back. Some days it will be almost aligned. Therefore, normally you never need to adjust the clock. But it depends by the quality and stability of the AC frequency coming from the power plant where you are supplied from. Moving from Italy to Germany, I noticed that my clock radio with the LM8560 is considerably more accurate in Germany than Italy. Here, I never need to adjust it.
Anyway, even the quartz clocks are not so accurate as they could be. A quartz clock will run constantly a little bit in advance or in delay, forcing you to adjust it at regular intervals. In theory, a well-calibrated quartz clock could provide an accuracy of +/-1 second per month, which is very good. I could obtain even better, with a wristwatch that I had in the past. But in the facts, the most quartz clocks sold on the market are built to provide an accuracy of +/-30 seconds per month. A not good performance at all.
I mentioned about comparing “second accurately” the time of an LM8560 clock… But how can you display the running seconds on the display of a clock with an LM8560? Don’t you have yet find out it by yourself, playing with the clock’s buttons? Below I will explain all the “hidden” tricks of the LM8560.
As first, if you want to know, without opening it, whether your alarm clock is built with the chip LM8560, just check some of these points:
1) The display is strictly 4-digits LEDs, not with liquid crystals.
2) It has only one alarm time that can be set. If your alarm clock is old, it has 2 alarm times, it should be one of its bigger brother chips, rare to find, like the LM8562 or the LC85632.
3) It has the store place for a 9V backup battery. Not any batteries with lower voltage.
4) It has this 6 or 7 function buttons: Time, Alarm, Hour, Minute, Sleep, Snooze. Eventually there is also an “Alarm reset” button, but normally the two buttons are wired together, so that the “Alarm” button has also the function of alarm reset.
5) It has some “hidden functions”,like the possibility to display seconds, as I will describe below.
– Its “hidden” functions
The hidden key combinations:
1) Display seconds: Hold down the “Alarm” button and press “Sleep”. Or do vice-versa as well. Then you can release one of the 2 buttons. On the left side of the display, the digit of the minute units is shown. On the right part, the seconds runs. This is my favorite function and no manufacturer of alarm clocks has ever implemented a dedicated button to display the seconds. All this to save few Eurocents on the final cost. I modified my clock radio, so I can keep the seconds displayed as long as I want, and it is very convenient to adjust the clock, second accurately.
2) While displaying seconds, press the “Hour” button: the seconds will be set to zero. If you press it between the 30-59th second, the minute will be increased by one.
3) While displaying seconds, press the “Minute” button: the time stops! This function is also very useful to align the clock, seconds accurately.
4) While displaying seconds, press both the “Hour” and “Minute” buttons at the same time:
The clock time resets to 0:00
5) Hold down the “Time” (or “Clock”) button and then keep pressed “Hours” and “Minutes” together: both hours and minutes increase at the same time at the rate of 2 digits per second. This is useful if you need to set up the clock time from zero, when you are in a time with high digits numbers.
6) Hold down “Alarm” and then press “Hour” and “Minute” together: the alarm time is set to 0:00
7) Hold down “Sleep” and then press “Hours”: the timer for the radio sets to 1 hour and 59 minutes, the max possible time for the sleep function. This setting possibility sometime is written in the user manual, sometimes not.
One thing I didn’t notice, and I always missed to read in the user manual, is that to turn off the alarm until the next day, just press the “Alarm” button (my clock radio had no dedicated “Alarm reset” button). Instead, I used to move the alarm selector back to the OFF position and then moving it again to the Alarm position, every day. So if anyone else missed it, just press the Alarm button, or the “Alarm reset” if present.
And some unwanted behaviors…
Due to the way how the buttons are wired to the LM8560 on the most clocks, the clocks with this chip have also some unwanted behaviors. Behaviors that can have unpleasant consequences, when the next day the alarm clock has to wake you!
1) Hold down the “Hour” button and then press “Alarm”. You would expect that only the hours of the alarm time get increased. In reality, the hours of the clock time increase too!
2) Hold down the “Minute” key and then press “Alarm”. The minutes of the clock increase too!
3) The same happens if you hold down the “Minute” or “Hour” button and then press “Sleep”.
Therefore be carefully when adjusting the alarm or the sleep time! If you inadvertently decrease the pressure on the “Alarm” or “Sleep” button and its electric contact opens even for a fraction of second, also the clock time will be increased! It is easy to happen when you set the alarm or sleep time using only one hand.
If the mist happens and you don’t notice that the clock time has increased… the next day the alarm will ring a few minutes earlier, in the best case, or at worst, a few hours earlier!
4) When the alarm rings (buzzer or radio), independently by whether you have already temporarily snoozed it, press the Sleep button and then the Snooze button. The alarm will be deactivated completely, until the next day. As if you press the Alarm or “Alarm reset” button! This seems to be a bug or “feature” of the chip itself. It is not related to the wiring of the buttons. Therefore, be carefully what keys you press, when you want just snooze the alarm!
5) When you press the Snooze button after that you have already snoozed the alarm, the snooze timer resets. Example: The alarm rings at 8:00 and you snooze it immediately. The alarm now is silenced and it would ring again at 8:09. But if at 8:08 you press the snooze button, it will ring again at 8:17, not at 8:09! Bug or feature, keep it in mind.
Technical curiosities
The evil beep beep!
I hope no one really uses to wake up that evil loud and crazy unpleasant beep! beep! buzzer. A friend of mine didn’t know that you could also wake up listening the radio, and for years he had kept the alarm switch on that evil beep set, instead of the radio! But where did that beep come from? That beep is the same in all radio alarm clocks with the LM8560 and it has a frequency of 900 Hz. This frequency is generated by the RC oscillator that is used for the power back up system.
– Limitations of use
Clocks based on counting the frequency of the AC power are not suitable to operate in places where the AC voltage does not come directly from the fixed national power grid. For example, portable emergency generators, camping generators, or large UPS power backup system, which have no active control over frequency changes over time. The alarm clock will therefore tend to shift the time by several minutes in a few hours. The could happens onboard ships. Who takes one of these alarm clocks on a cruise could do the experiment. Just synchronize it with a wristwatch and check after a few hours or days, how much the time will be shifted.
Quartz alarm clocks have not this limitation, because the oscillation frequency of the quartz is totally independent from the accuracy of the AC frequency.
– Make a quartz clock of it
You can make a quartz clock using an LM8560, by adding a small circuit which contains the quartz oscillator and a frequency divisor, which downclocks the quartz frequency to 50 or 60Hz, the value that the LM8560 expects to count. You can do it using a quartz with frequency 3,579 MHz and the frequency divisor IC MM5369, as shown in this diagram of a clock built with the LM8365, where the pin 36 is the input of the 50/60Hz frequency.
Simply connect the 50/60Hz output coming from the R7 on the pin 1 of the quartz oscillator built with the MM5369, to the 50/60Hz input pin 25 of the LM8560.
Once you have added a quartz, It is also possible to feed the clock directly with DC power supply, if you need. You have to add 2 or 3 transistors to use the 50/60 Hz clock signal generated by the quartz, to switch the DC power alternately between the two groups of cathodes of the duplex display. If the segments are not displayed correctly, exchange the 2 lines to the display.
Look at this schematic. To feed the whole circuit with DC, simply the components on the left of the C1, and apply the DC in parallel to C1, which should be no more necessary too. See also this schematic.
– Operating modes
The LM8560 cm be set to display the time in 12 or 24 hour format, and it can be set to count the time using an AC power frequency of 50Hz (as in Europe) or 60 Hz (as in north America). These settings are made by adding or not, bridges to the related pins of the LM8560.
– Its relatives and predecessors
The LM8560 has a family of important predecessors, but these have been dropped almost immediately in favor of the 8560. This was the MM53xx family, such as the MM5309 or the -11-12-13-14-15. All of these chips (except I think the MM5312) had the interesting ability to control 6-digit displays, so the seconds could be displayed together with hours and minutes on the display.
Also the family MM53xx worked on the same principle as the LM8560, counting the AC frequency, but it did not have a backup system built in for power blackout. The MM53xx could drive a standard 7 segments display common cathode, multiplexed. It needed also a few more external components to drive the display. Probably to save on all those extra components, and because of the missing of a power backup system, this chip family was dropped in favor of the successor LM8560.
– The duplex Display. A not versatile but clever solution
This is where it gets a little too technical, and only the electronics hobbyists may be interested in. I try to explain the important points in a simple way, for those who want to know a little more about how this duplex LED display works, that was so popular in alarm clocks.
The LM8560’s display works differently than the numerical LED displays found commonly in other appliances, where the digits are “multiplexed”. The display which works with the LM8560 is a custom-made display for this chip. It is a so called “Duplex” display. It is a smart solution for the industrial manufacturing of alarm clocks, but it makes the LM8560 not suitable for the hobbyists who want to build a their own alarm clock using a standard LED display. Let’s see why.
Normally, the numeric LED displays with more than one digit, are driven using the Multiplex system. The digits are not lighted all together at the same time. They are lighted in turn one at once, just for a fraction of a second each one. After the first digit has been turned off, the second digit is turned on. It is repeated in cycle through all the digits. The process happens so fast that the eye sees the digits as all lit on, but they aren’t.
It is done in this way in order to reduce the number of the output connections (wires or leading tracks) necessary to connect the chip to the display.
To notice if a display is multiplexed, you can simply move it quickly horizontally in front of your eyes, without follow it with the eyes. If it is multiplexed you will see the digits as broken and flickering. If, the digits are really continuously lighted, they leave a continuous trail without breaks.
In some LED multiplexed displays, the multiplexing frequency is enough low that you can perceive the flickering, especially when watching them with the corner of the eyes.
In numeric LCD displays the digits are multiplexed too, but since the monochromatic LCD displays have a very high persistence, the effect of multiplexing is not visible even by moving the display quickly.
With the multiplexing, regardless of how many digits the display has, the chip needs to have only 7 output pins to drive the 7 segments for a single digit. All the digits are connected to these same 7 outputs. Just a few output pins more are needed to select the digit to be lighted on. The Multiplex circuit, built inside the chip, connect the power supply only to the digit that has to be lighted during its turn, while all the other digits will be disconnected from power.
Using only 4 digits, the LM8560 in order to reduce the number of the output connections to the display, uses a low-cost, ‘smart’ 2-phases multiplexing system. The 4 digits are not turned on/off one at a time. The whole display is divided in only two groups of segments, spread among all the 4 digits.
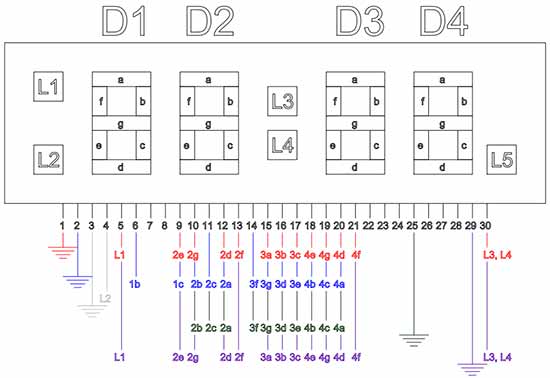
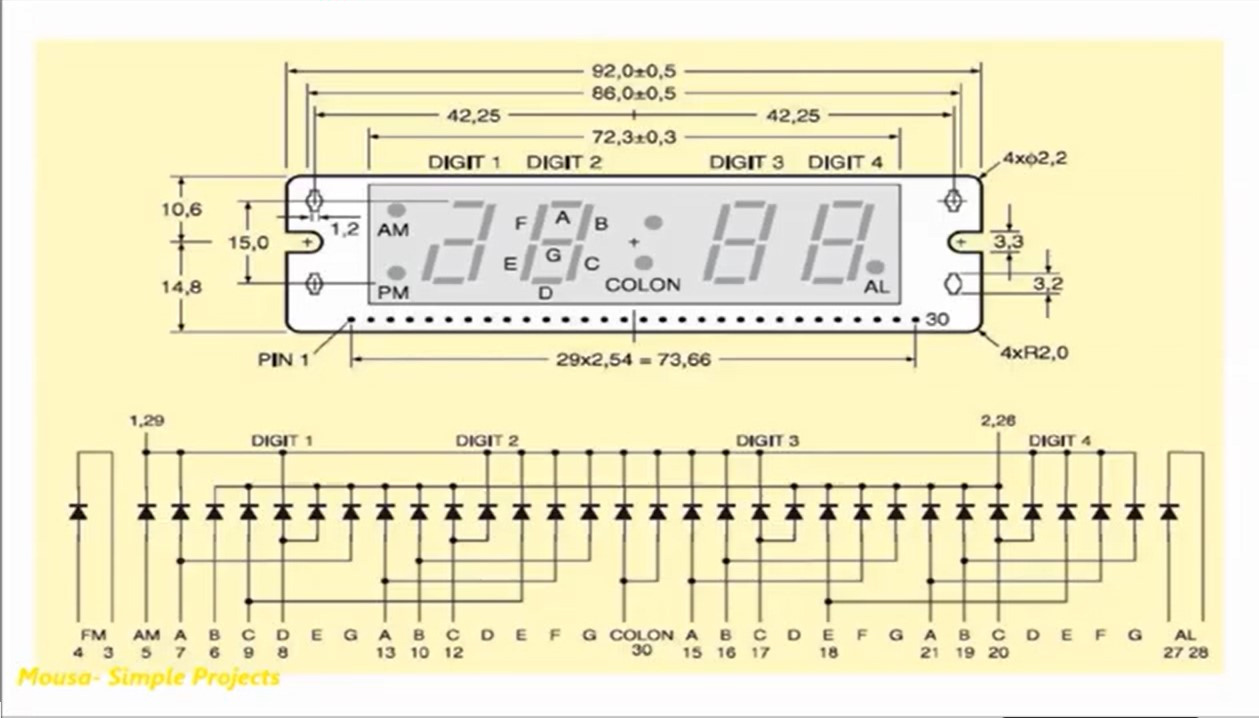
The cathode of the segments of each group are connected together, meanwhile the anodes of the segments are connected together in couples, two by two segments. The 2 cathodes of each couple are connected to the 2 different groups of the common cathodes. In this way, exploiting the dual power supply coming from the AC transformer, a single output pin of the LM8560 can drive 2 segments, but not at the same time. One segment of the couple will be turned on during the positive half-wave coming from the AC transformer, and the other segment during the negative half-wave. The LM8560 will connect the anode of a segment to the power supply, only when that segment has to be lighted. See it in the following diagram. Don’t get confused by the presence of 2 LEDs in parallel in each segment. Normally in small displays there is only one LED inside of each segment, but in this project there are 2.
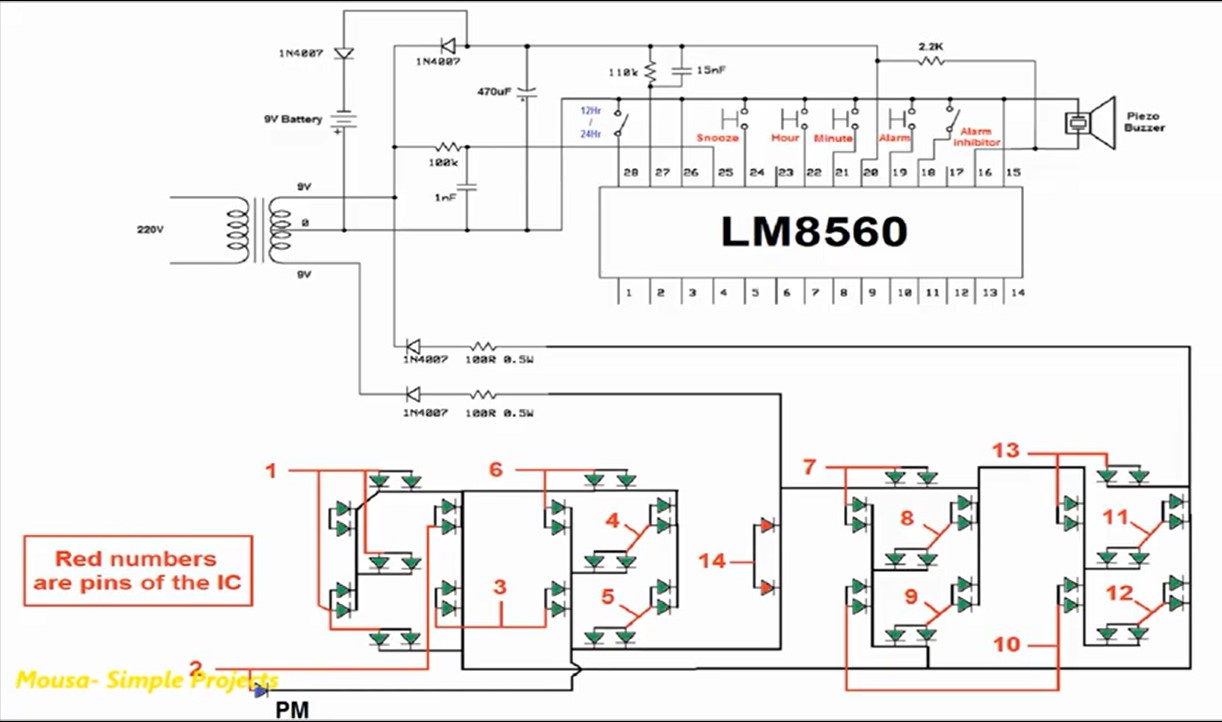
Thanks to the Mousa Simple Projects blog for this diagram
https://mousa-simple-projects.blogspot.com/2020/10/24hr-digital-led-clock-without-using.html
Here there are two schematics of the duplex display which is commonly used with the LM8560:
Here you can find a PCB in editable form, where you can modify the layout of the connections to fit the LEDs that you want use: https://oshwlab.com/Trajectory/tests
You can also modify it to accommodate 1 LED per segment with SMD LED format to replace entirely an old display. The SMD LED form factor 0805 (2,0 x 1,0mm) should be most suitable size to replace faulty LEDs on the old displays, or to rebuilt the PCB with the same size of the original display.
The 2 groups of segments are switched on/off alternately, accordingly to the half-waves coming from the transformer (50 or 60 Hz) transformer. Therefore no additional components are required to select and drive the on/off switching of the digits.
Being divided in only 2 groups of segments, alternatively switched on/off, the display is called ‘Duplex’.
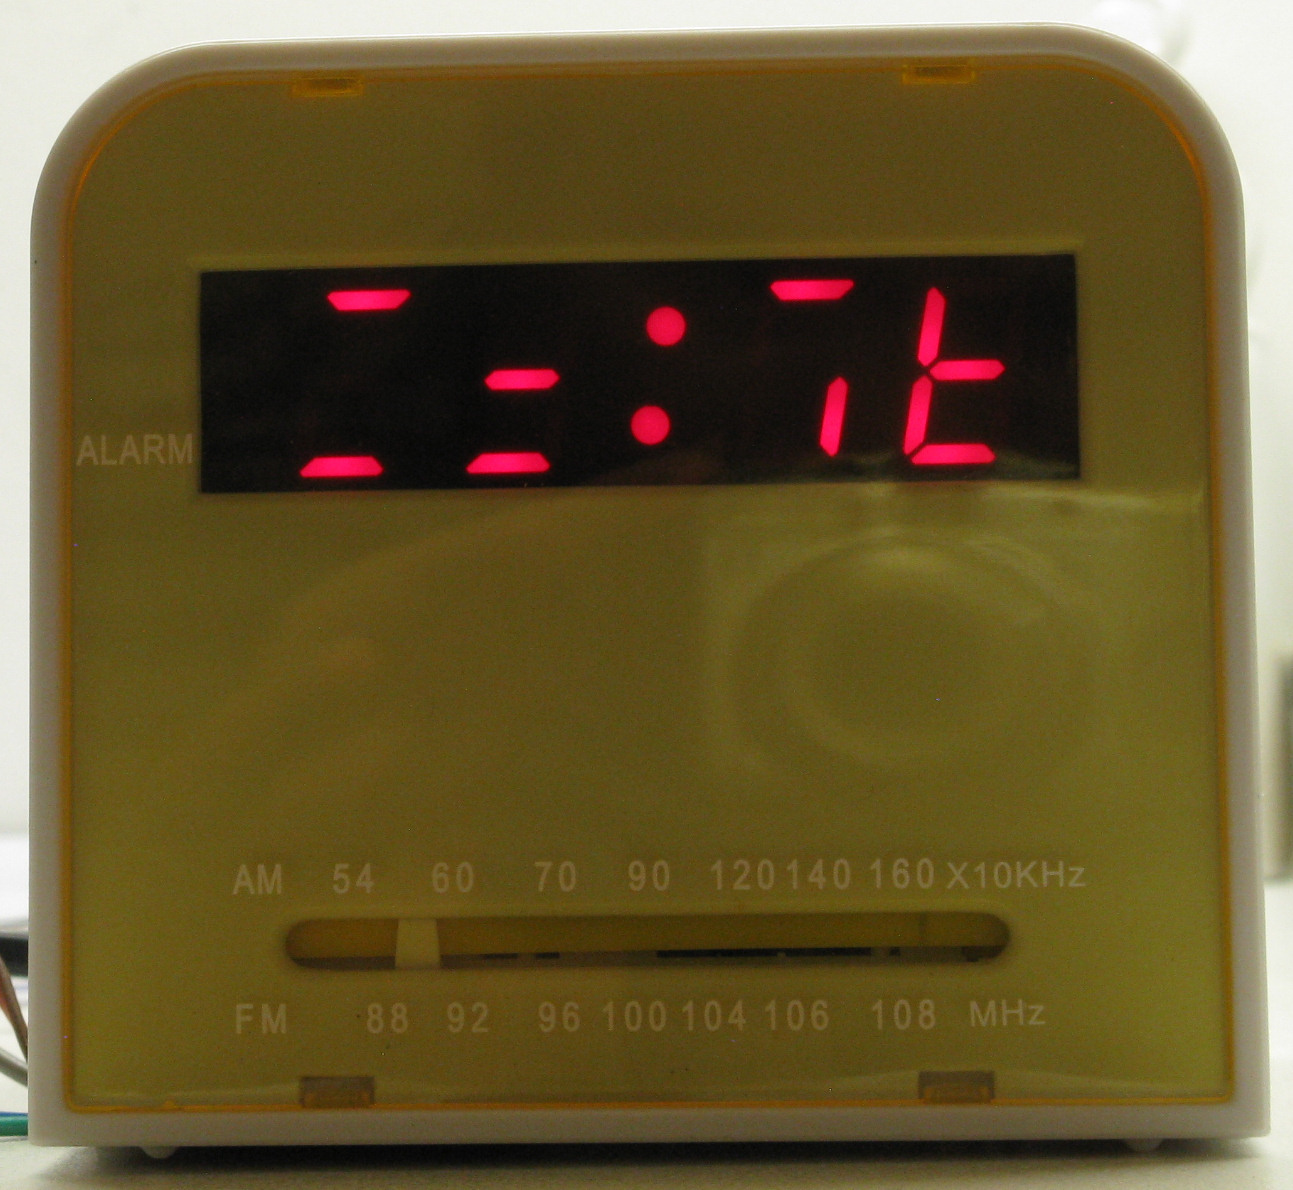
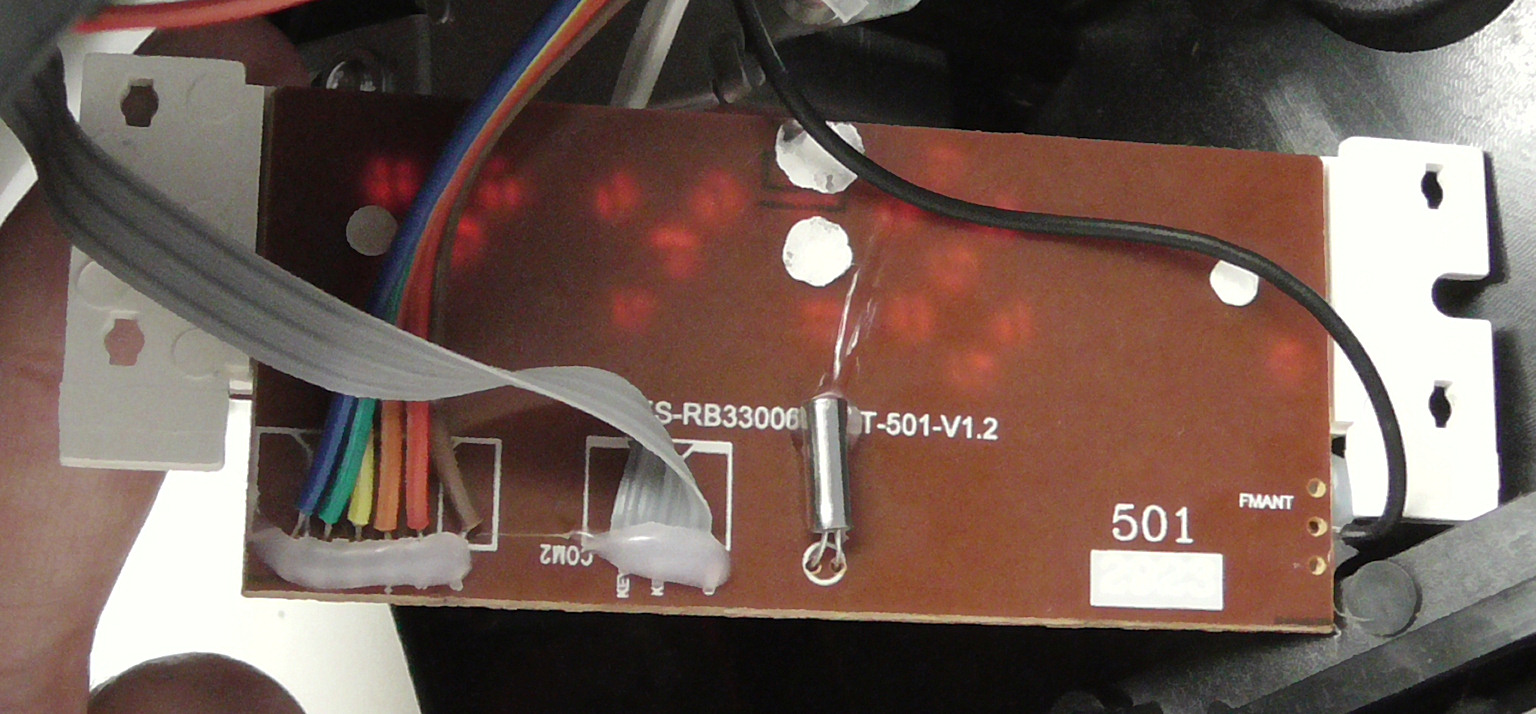
As you can see in the images bottom, taken with a shutter speed shorter than 1/00 sec., you can clearly see the two groups of segments that compose the digits. Despite the appearances they, are never turned on all together.
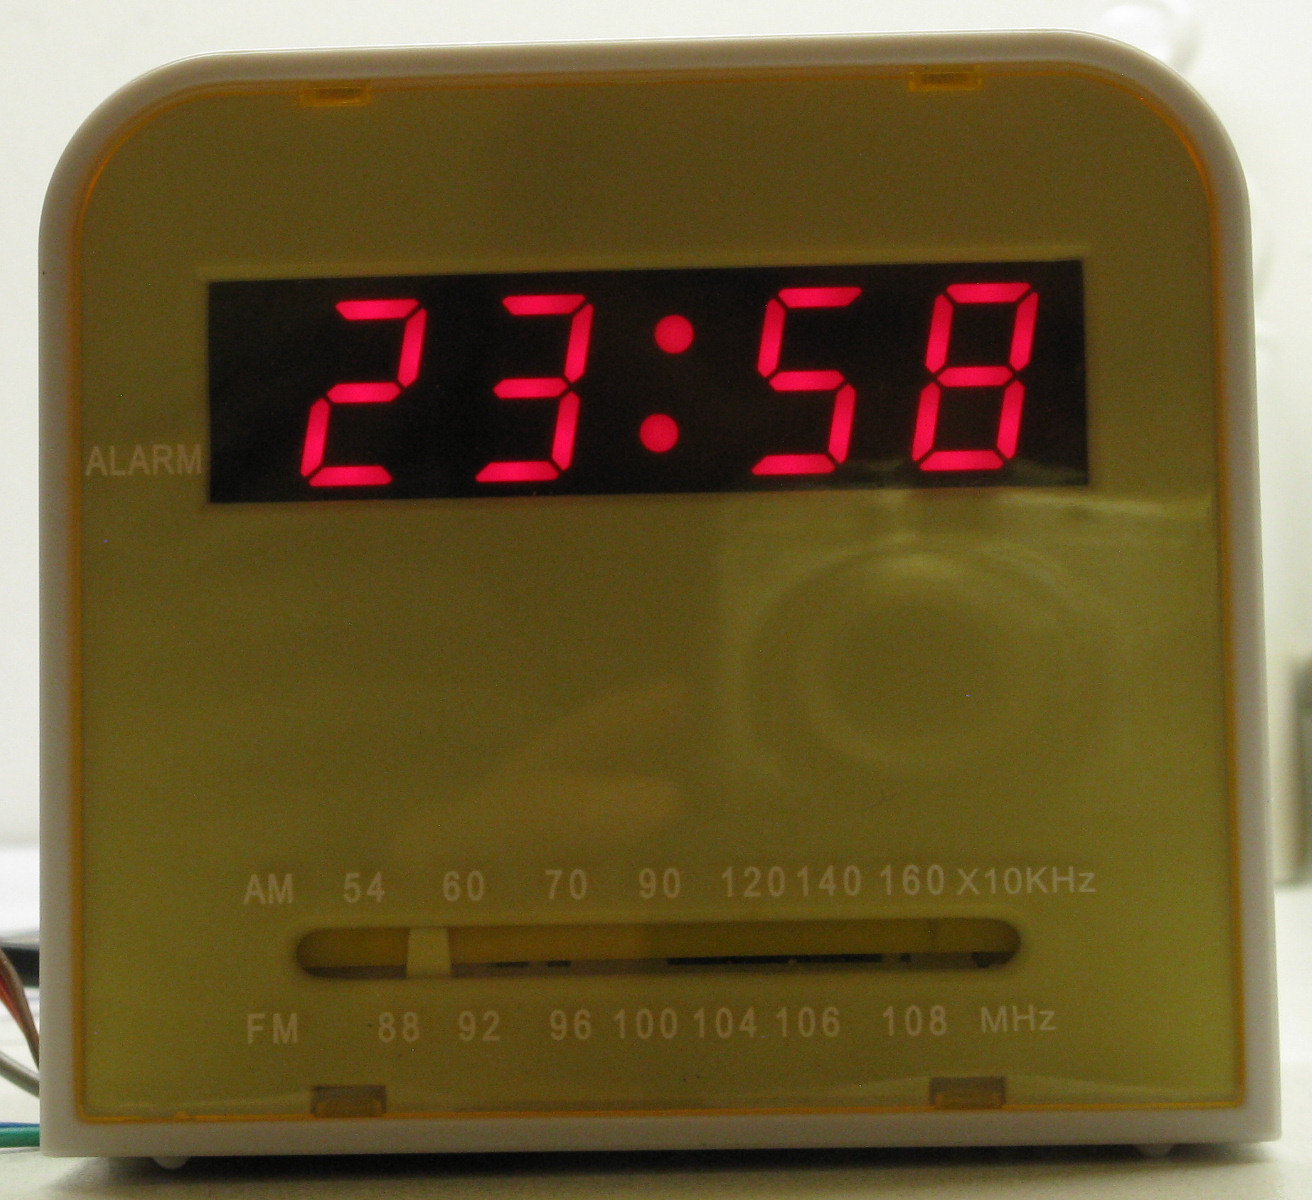
=
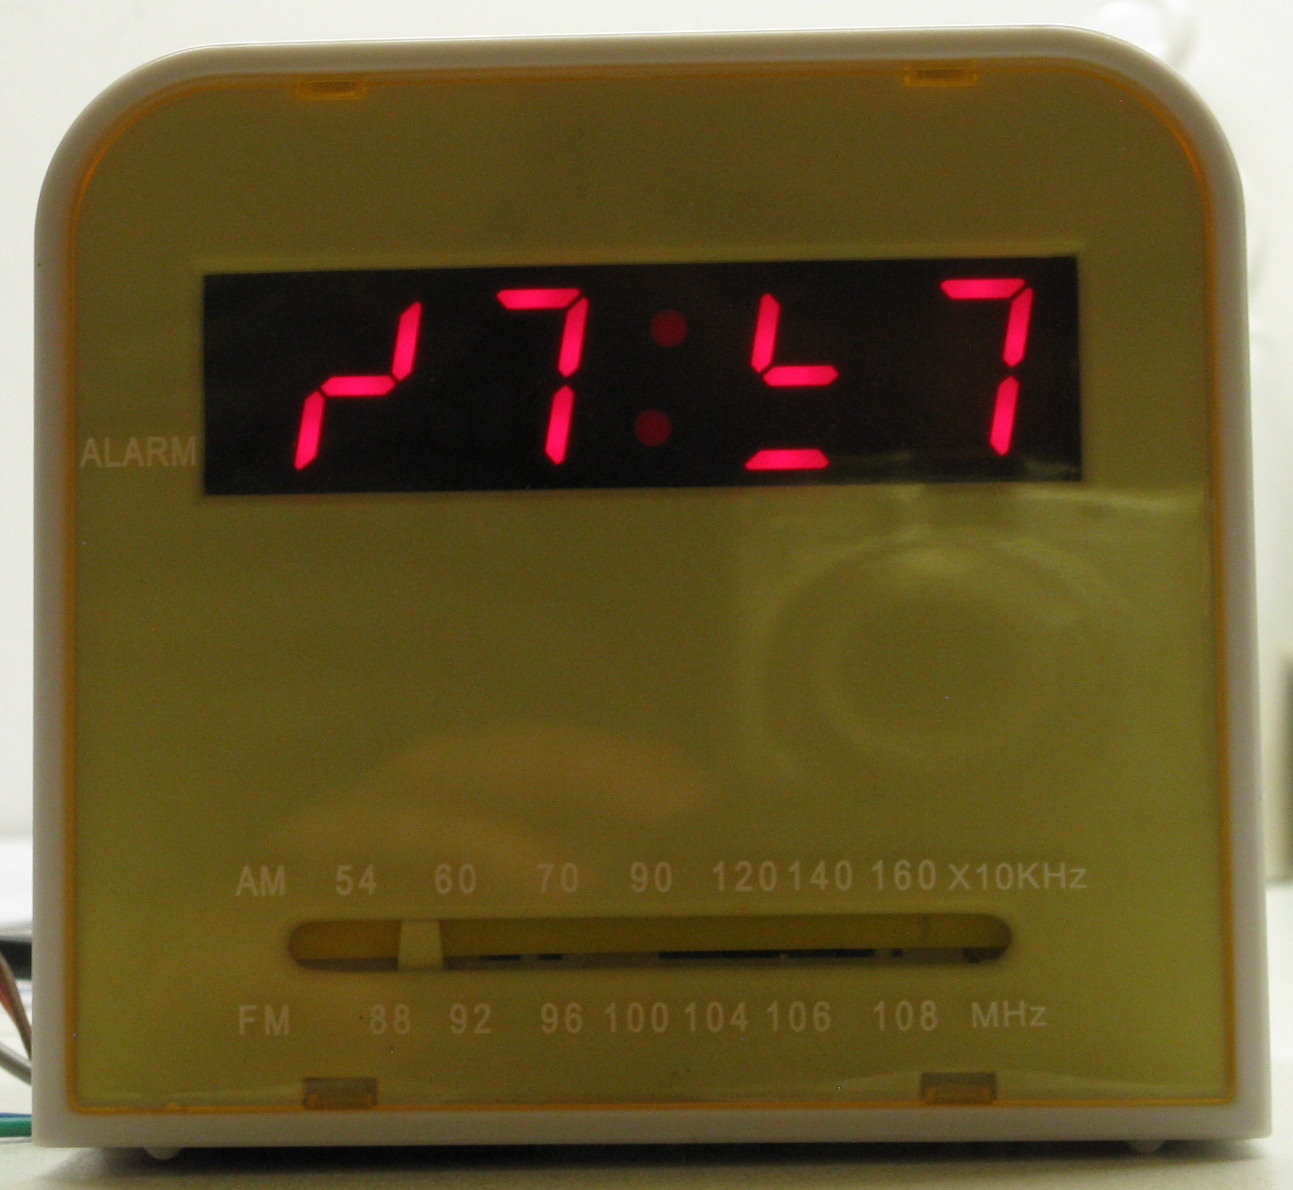
+
Not the best chip for the electronics hobbyists
Requiring a single block specific duplex display, the LM8560 is not the best clocks’ chip for the electronic hobbyists. The Duplex display for the LM8560 is discontinued, it is almost impossible to find as spare part for sale today, and it can’t be replaced with standard 7-segments display modules with common cathode. In the standard modules, the cathodes of all segments of a digit are connected together. You can’t recreate the internal connections among the segments as they are in the duplex display, because the cathode of some segments of a digit has to be connected with the cathode of a segments of another digit. To do this, you need a display modules in which all the segments have their anodes and cathodes free, not connected in common. But such digits modules do not exist, as far I know.
Therefore you can create a duplex display only by using single LEDs, as Mousa did in his self-made clock with the LM8560. Sure, in this way you can create digits of the size and shape you want.
Another problem for the hobbyists is that the package of the LM8560 is a shrink package. In order to reduce the space occupied on the boards of small clocks, the spacing of the pins of the LM8560 is 1,78mm, not 2,54mm as the common standard. It means that the pins of the LM8560 don’t fit in the standard 28pin sockets or in the pre-holed boards. But if you make a custom board for your circuit, this is not a problem. Sockets with spacing 1,78mm are today extremely hard to find, if you want mount it on a socket.
For the hobbyists, clock ICs that can drive the standard 7-segments modules with common cathodes are more suitable, like the LM8365. It has also 2 alarm times.
My alarm clocks
– An advice first: Why red LED displays are my favorite:
For stupid trend reasons, red LED displays are disappearing, being replaced by other colors, such as green and even worse, blue. Since 2007 Sony produces no more alarm clocks with red LED display. Red LEDs were the first to have been invented and for a long time, red was also the only LED color available. Only because of that reason, red LEDs are perceived today as something “retro”, but in alarm clocks the red color has also its own functionality.
The highest sensitivity of the human eye is to yellow light, then to green, then to red, and as last, to blue light. When you look at the alarm clock during the day, the color of the display may not make a big difference, except for blue, which can be really hard to read. But in the night, if you sleep in an almost completely dark room, the color of the display makes a huge difference.
A red display in the darkness, even a quite bright one, will not make visible the whole room to your eyes. A green display (or worse a yellow one), even if with a weak brightness, will also showy you the whole room. This is why I want only red LED displays for my alarm clock.
LCD radio clocks have usually a yellowish or green backlight display. Right due to the reason explained above, in some LCD clocks the backlight is normally off, and in the night you have to turn it on manually when you wish to read the time! For me, this makes no sense in an alarm clock to be used in a bedroom.
The red backlight used in LCD displays (rare to find) is of a lighter tone then the LEDs display and it illuminates also the rest of the room, even if less strongly than how the green LEDs do.
My first clock radio, by Majestic 1986
As mentioned before, thanks to the LM8560 the price of clock radios dropped. In the mid 1980s some supermarkets even offered a clock radio as prize for the collection of their purchase-points. Back then, prizes for purchase points were normally something boring, like a set of glasses, cups, or dishes with table baskets. They were no electronic gadgets. A digital clock radio appeared like a super cool and technological prize! Never seen before. It seemed impossible that they could give a so much electronic device “for free”.
One of these supermarkets was in my little town, where I lived in Italy in 1986. I was 15 years old and I always wanted an alarm clock radio all for me, with luminous digits.
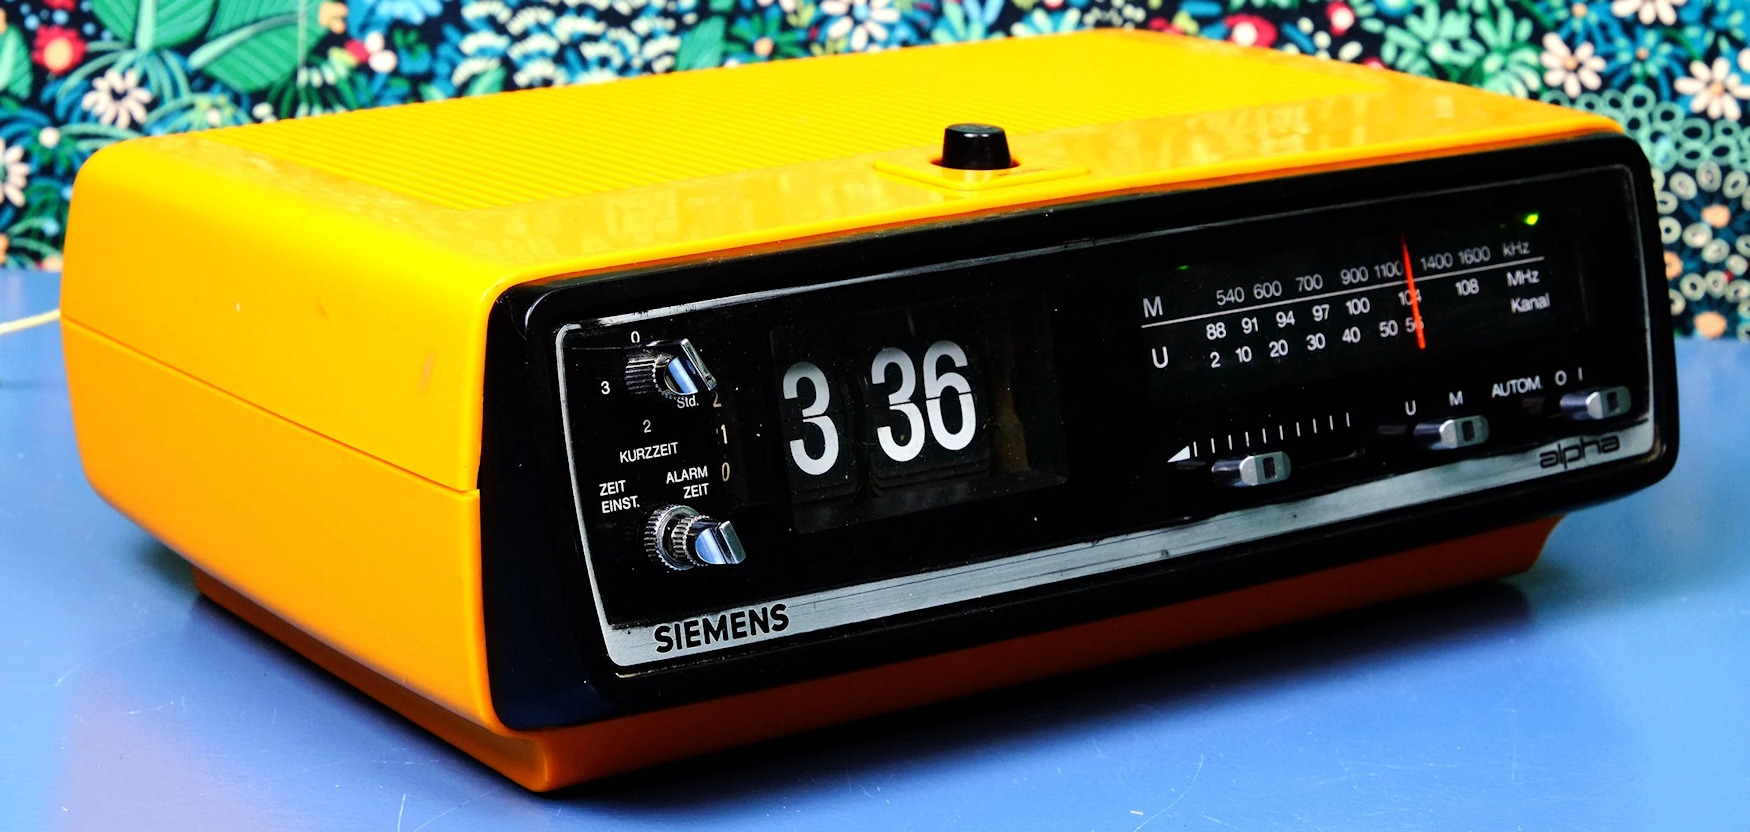
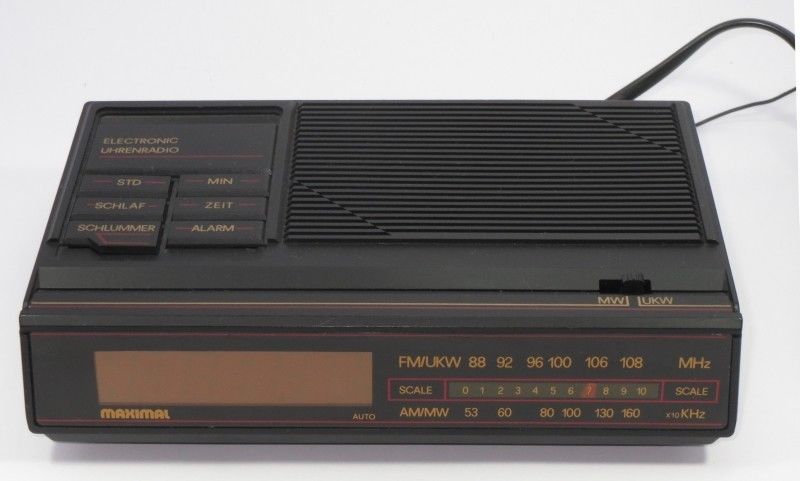
Between September and November 1986, I don’t remember exactly, it was the time to pick up the prize. I remember the bike ride to the supermarket to pick up the clock radio. It was a model branded by Majestic, an unknown retailer of rebranded cheap electronic ware made in Asia (Hong Kong in this case). Here below a photo of the same identical model that I found here in Germany in year 2017, in incredibly new conditions. The only difference is the inscriptions in German language, instead than in English, and the brand name Maximal instead of Majestic.
Maximal 8688 (same as Majestic)
Arrived at home, as soon as I checked that it worked, I opened it to see what it looked like inside. I remember the disappointment seeing that the clock was made with only a single chip, with few other components around it (apart the radio section), and without a quartz, which I liked much to have. Quartz back then were a symbol of precision and anything with a quartz built in, looked to be prestigious! Today with 15 € you can buy a radio-controlled clock, constantly synchronized via radio with an atomic clock, which is accurate to one millionth of a second.

One day, talking with the owner of a little electronics shop about my disappointment that my new alarm clock had no quartz inside, he said to me, “But what? As prize for the supermarket points did you wanted a quartz radio clock?! It counts the 50Hz and let’s go! It’s already much if they gave it!”
This glorious clock radio lasted in service until 1998. In the meantime, I played with the keys so much that after 11 years, the paint and marks were completely worn and the black plastic underneath had been completely exposed.
After 11 years of honored service I had gotten a little bored to have always the same clock radio, and I decided it was time to replace it.
My original Majestic unfortunately no longer exists. In its last months, it happened two times that the alarm didn’t ringed, despite being properly set. The only cause I could guess at than time, was a faulty contact in the selector switch. But although I had cleaned it with proper cleaning spray, for a third time it did not ring. Then I had fun demolishing that radio clock. What a mistake! Today I would keep it as a vintage heirloom! I kept as memory of it, only the PC board broken in 2 parts, without display and without the IC LM8560. I cut away the IC, thinking that it was faulty. If I had the datasheet of the LM8560 at that time, I could have a better clue about what what could be the failure and repair it!
Sony ICF-C102
Compared to the Sony’s clock radios (my sister got already one) the audio quality of the Majestic was poorer. I still didn’t knew, that the blame was of low quality speaker, rather than of the radio. So I decided to afford a Sony too, and doing that, my alarm clock odyssey began, and lasted until August 2007, right before my departure from Italy.
The first Sony clock radio I purchased was a cube-shaped model with green LED display. The Digicube ICF-C102. I wanted experiment the green LED trend too:
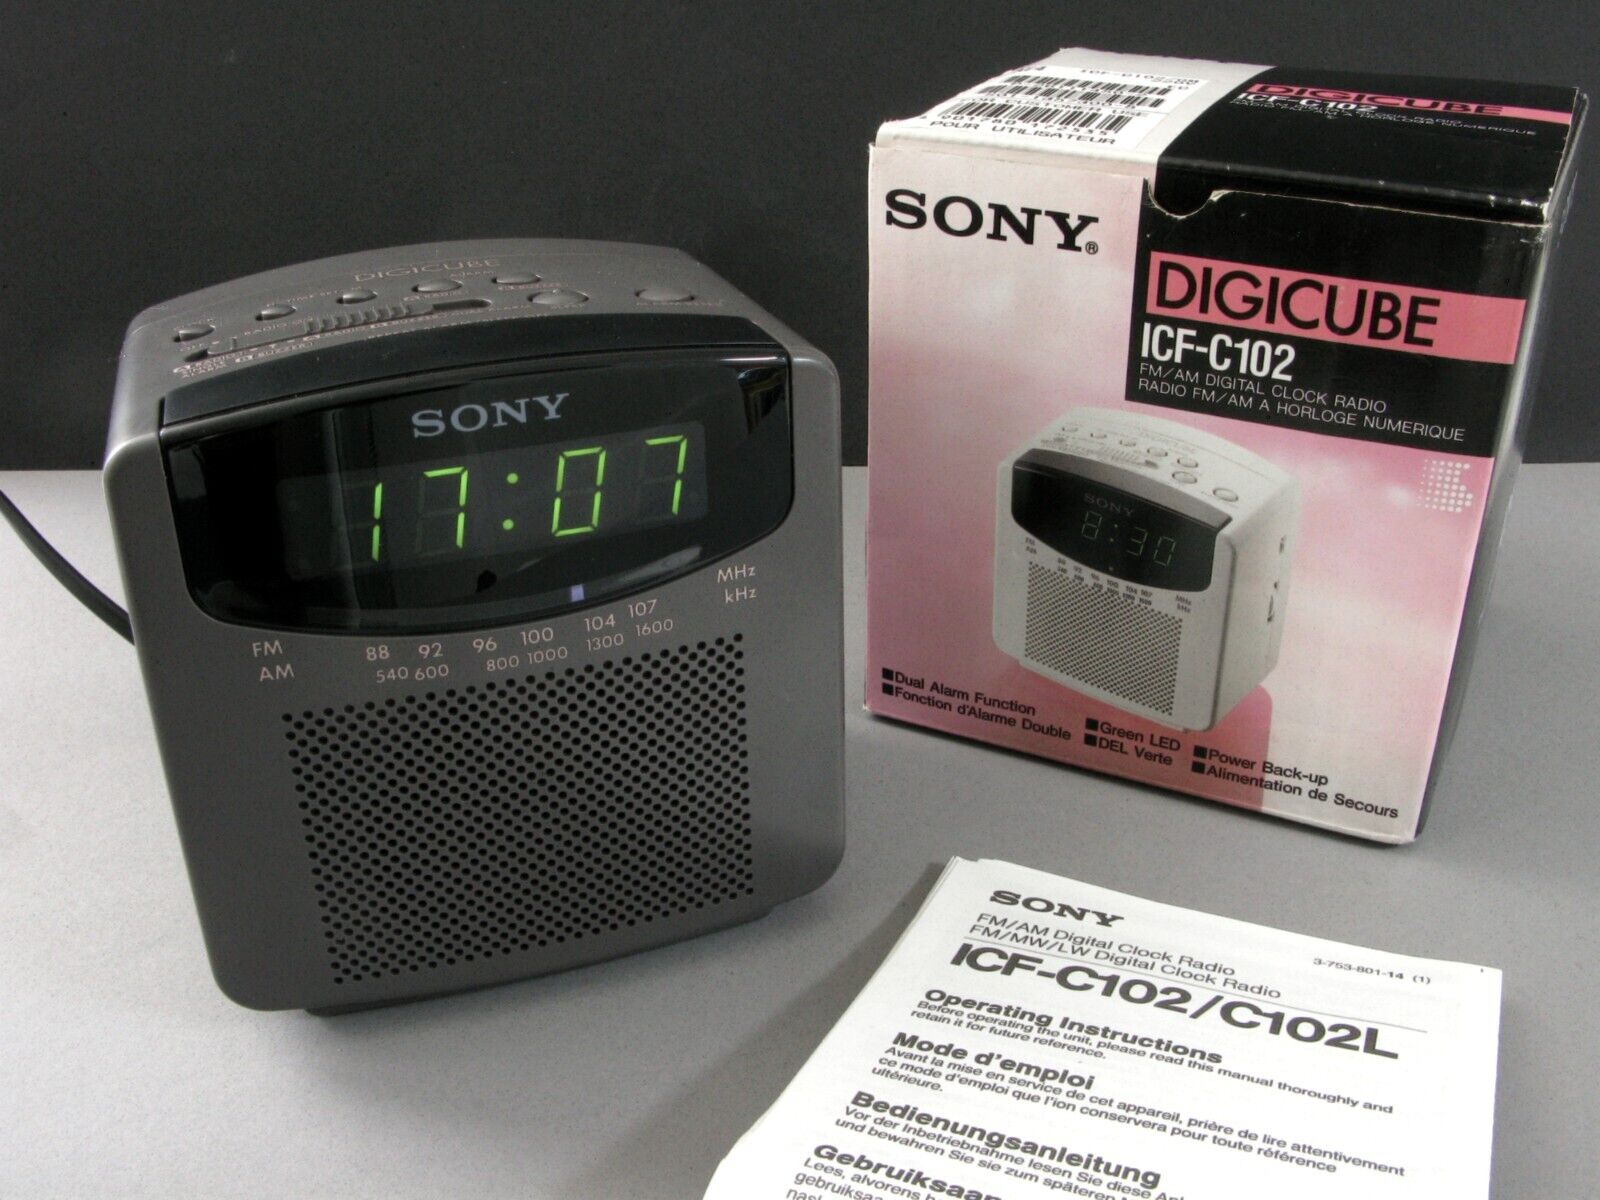
I brought it home, and after verifying that it worked, I opened it to see what there was inside. Given the price of more than twice as much as a ‘budged’ clock radio, I was sure that all the Sony’s clock radios were based on a quartz clock… Instead not… I opened it and the clock was made with the chip LM8365. It works with the same principle of the LM8560, counting the AC frequency, but it drives a standard 7-segments display with multiplexing. I think to remember, that the flickering of the display was in some conditions, somewhat more perceivable than on the clocks with the LM8560. Also once again, this was not the time to get a quartz clock radio.
Beside this surprise, I noticed that its green display, behind the dark glass, was much less bright than the red display of the destroyed Majestic, and during the daytime it was less readable. Instead, at night I had the surprise that the green light illuminates well my whole room! And even worst, I noticed that the radio is never completely switched off!!! I place my alarm clock very close to the bed, practically almost sticking to my head. When the radio was switched off, it was actually switched on, just kept with the volume set to minimum. If you put the speaker in proximity of your ear, you can distinctly hear the music from the radio station in the background, in addition to the background hiss that is always present when the volume is set to zero! During the daytime you can’t hear it, but in the night, in a silent room, you hear it clearly, if the clock is not enough distant from your head.
To me, as an electronic technician, this is an absurd design choice beyond any reason. I guess that the reason for this absurd choice is to don’t let you hear that classic small “stock!” noise, when you switch on/off the radio, that is usually audible in clock radios where the radio is completely turned of when it is not in use.
Compliments to the Sony’s engineers! To don’t let your hear that short “Stock” sound, which anyway can be minimized by designing better the audio amplifier, they let you hear the sound of the radio and the background noise of the amplifier all night long! Truly clever engineering!
And there was also another bad surprise. There is no alarm indicator on the display (usually a dot), that shows you whether the alarm function is inserted or not, as it is usually present even on budget alarm clocks!
The audio quality of the radio was high as expected. It mounted the famous radio chip Sony CXA1019S, mounted also in some small good portable radios by Sony, like the ICF-380 (the ICF-12 had a similar IC). The buttons were real micro switch buttons, not like those hard to press, that you find on the cheap alarm clocks. But the issue with the radio never turned off was so deleterious, that after 1 or 2 months trying to live with it, I placed that clock radio in another room, and I bought another one.
Given the good sound quality of the radio, I wanted try with another Sony, but this time I switched back to the red display, forever. I choose this time a more classic model, not a cube. I thought that Sony engineers were not so stupid to handle the turning off of the radio, in the same way on all Sony’s models…
My second and last Sony was the ICF-C290
It was still in the year 1998

The audio quality of the radio was good as expected. The radio chip was the same Sony CXA1019S, as in the Digicube ICF-C102. But also in this clock radio, the radio is never completely turned off! It is just kept at the minimum volume. And also here there is no LED dot that indicates that the alarm function is inserted! Looking closely at the display, the spot of the dot was present, so I drove the 10Km back to the store, thinking that my clock radio was faulty. The clerk tested it on the same model exhibited on the shelf, and also that one show no alarm dot. The clerk was quite surprised too.
In the darkness before to sleep, how I can know whether the alarm is active or not? How much would it cost more to Sony, to use that single led, that all the budget 10€ alarm clocks use? The Sony’s engineer have really absurd concepts ideas for their products. I have really no understanding for such choices.
Then I drove back to home, I opened the clock radio, and what was inside? The LM8560, as in my 11 years older supermarket clock radio prize! I was astonished. The giant Sony Company bought that low cost IC from Sanyo, instead to develop an its own custom clock IC, as they did with the IC of the radio?
This time I definitely gave up the idea about getting a ‘quartz’ alarm clock and I began to appreciate this immortal integrated circuit, companion of thousand nights, more or less sleepless! A low cost but well made, long living chip.
Since the audio quality was really good and I didn’t want an LCD clock radio, I modified the Sony ICF-C290 by myself, as the best I could do at that time. I made a hole in the front panel and I added a LED that indicates the activation of the alarm. I added a small reed relay that disconnected the speaker when the radio was off.
In 1998 it was not easy to get datasheets of electronic components, as it is searching in internet today. In 1998 I had even not yet internet connection and anyway there were very few contents. Make all those modifications without having any schematic diagram of the device and without the pinout of the LM8560 was not easy and not a fun job at all. But finally, my high branded Sony clock radio had the most basic functions that the budget clocks already have as standard. Congratulations Sony, see your clock radios never again!
But this is not the end of the story… After a few years the radio began to have tuning problems. I find that the variable capacitor of the radio was made of poor material and oxide has formed between the blades, and on the rotating contact. Right in a Sony, which should use only high quality components…
The Sony ICF-C290 lasted until August 2007, when the tuning problem had become so big that I finally destroyed the clock radio tearing it apart. What a satisfaction! I had enough of that crap made by Sony. I kept only The LM8560 and the radio chip as souvenir. The only 2 parts that deserved to be kept.
Thomson CR61, my final clock radio
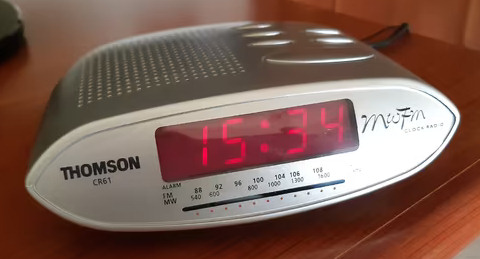
In August 2007 I was now in the mid of preparations for my moving to Germany and I had to look once again for a clock radio… I went around a lot of stores and with red display there were only very budget models, very cheap, very low quality and of unknown brands. Then in a big store I saw the Thomson CR61. I didn’t like much that model aesthetically, because I don’t like rounded shapes, but it seemed to be solid and well made. I could feel that the buttons were made, as usual on the budged clocks, with big slats bounded with adhesive plastic film. But they were very good to use. Too bad it didn’t have two alarm times, but by that time I knew well that I need a red display, so I picked it bought it. Price was 30€. Not a budged model, and not a Sony.
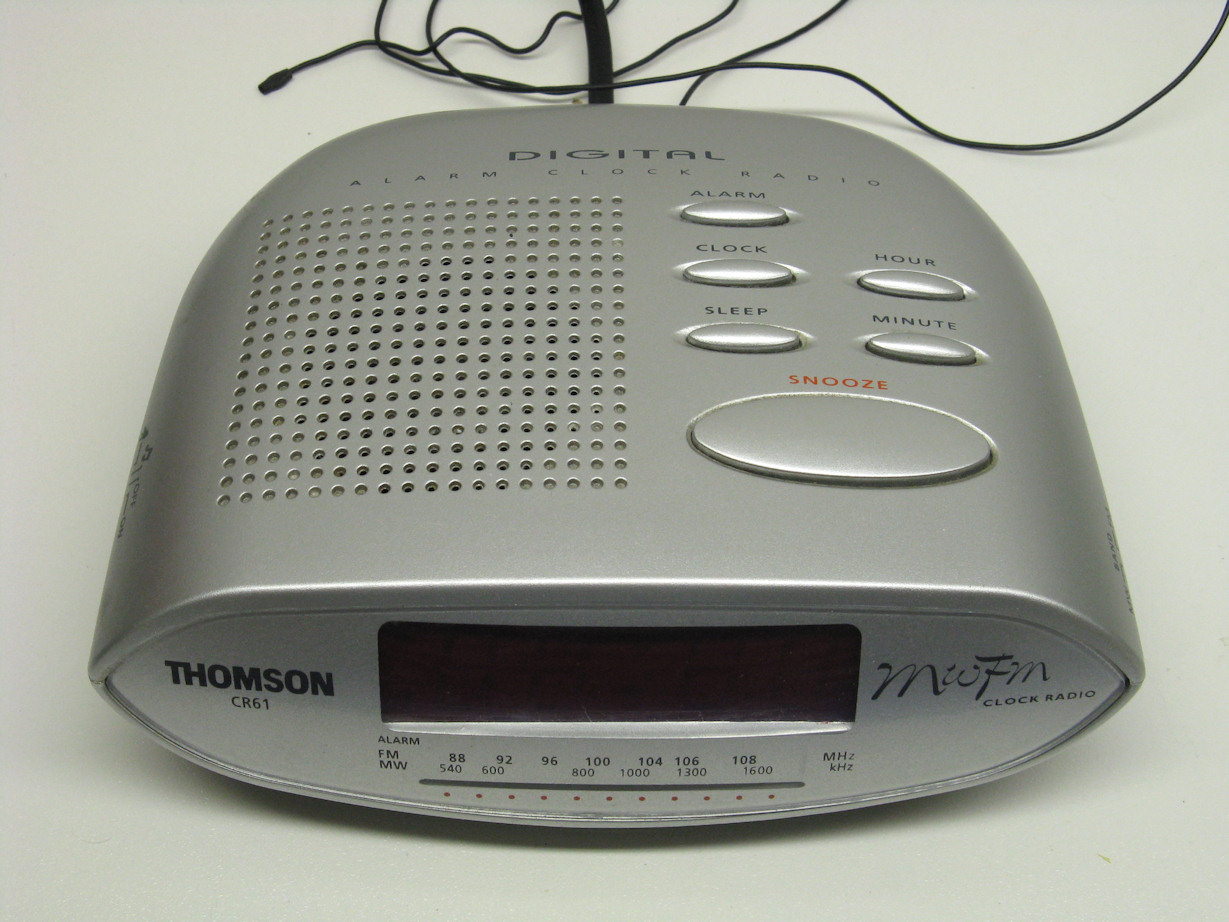
It was also the only model remained with a design still focused on functionality. For example, the buttons are good spaced between each other and are not grouped in a single circular mess of buttons, as it was trendy in those years. Much to my surprise, the audio quality of the radio is really good as the Sony! It lacks a bit in the bass tones, but the sound is really very clear and detailed.
Another surprise, the display was very bright. The brightest I found so far in an alarm clock, but in spite of that, it didn’t create any problem in the dark, right because it is red and not green. Now after 15 years, the brightness has dropped much, but it is still good very good in the night.
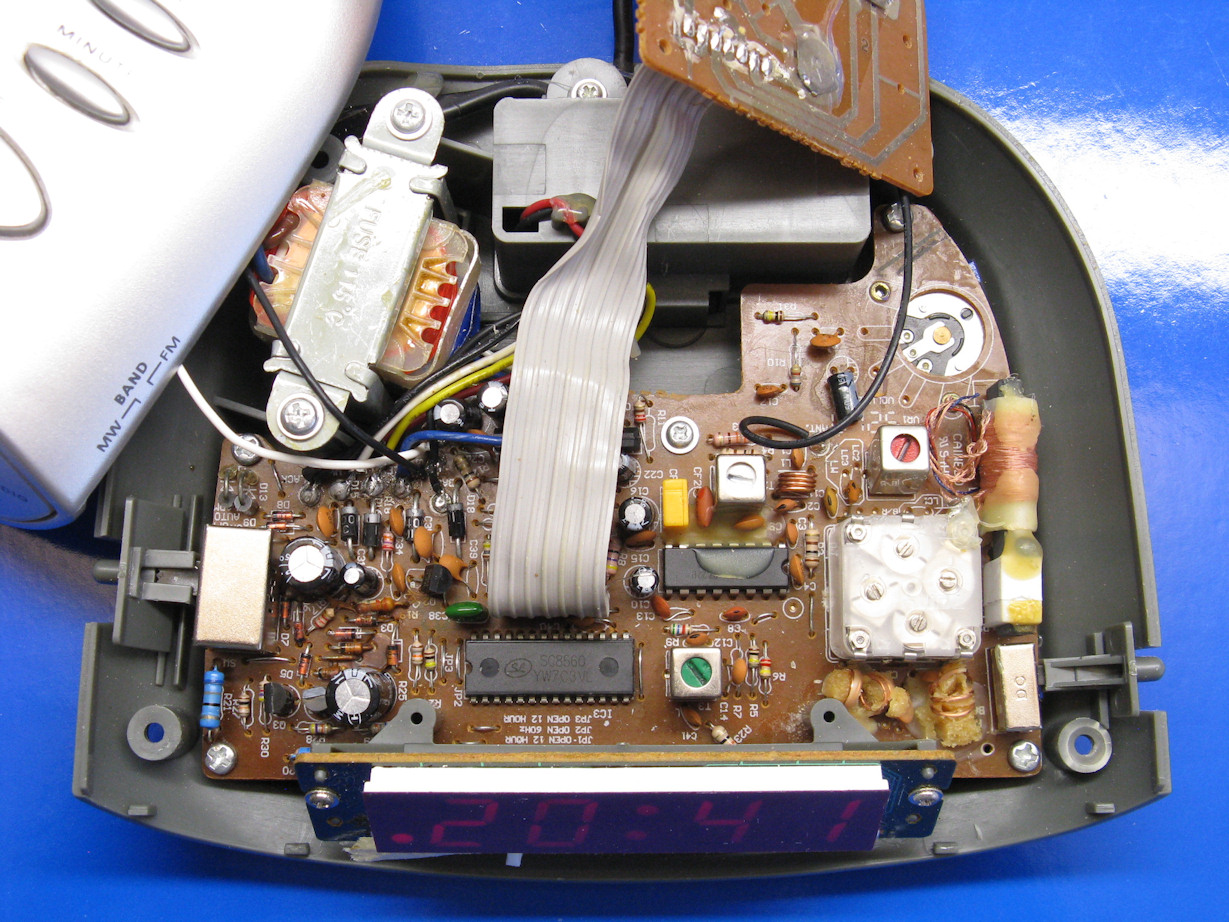
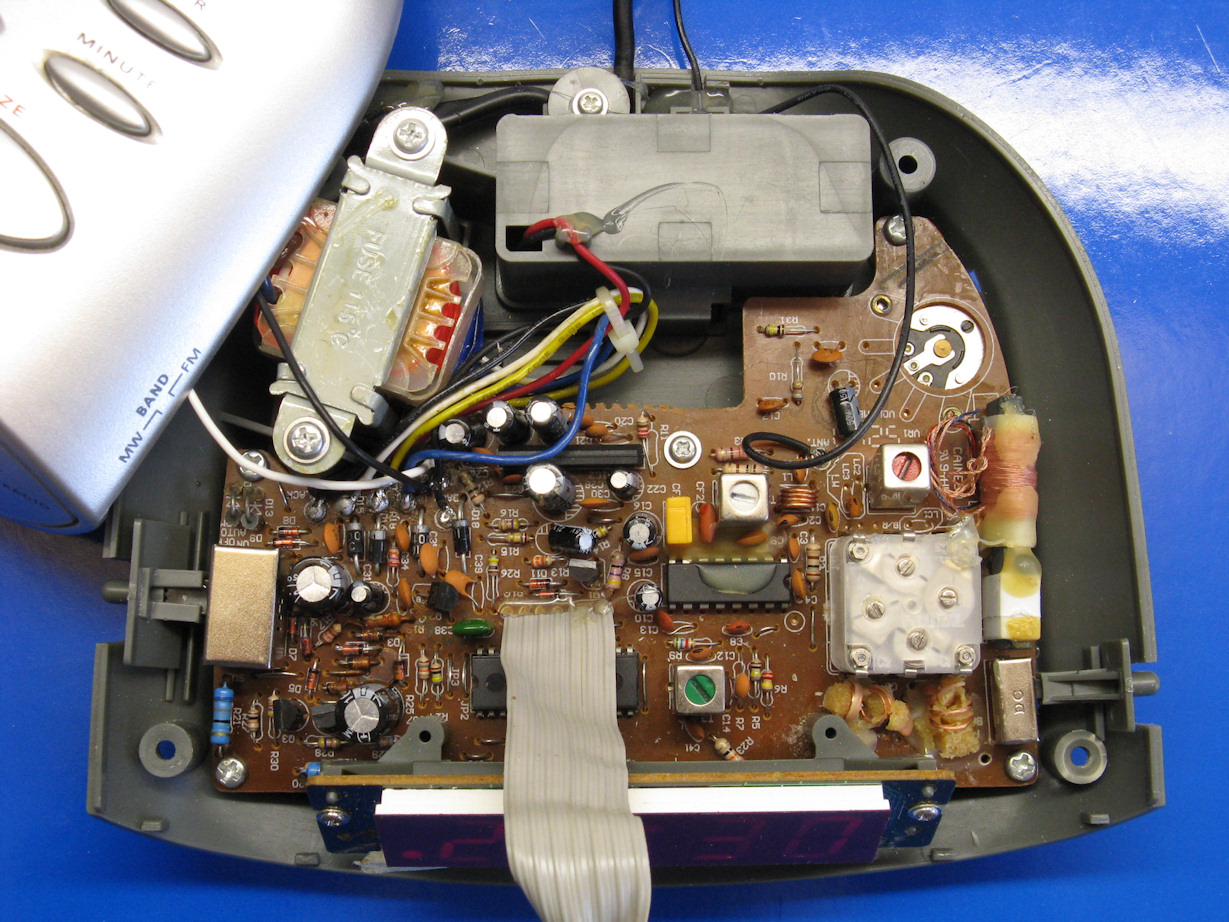
The only design flaw, indeed common to many clock radios of not large size, is that the speaker is so close to the AC transformer, that due to the induction, it plays a little noise of the 50 Hz generated by the transformer. If they placed the speaker on the right of the case and the clock buttons on the left, the unwanted effect would not happen. In smaller clock radios, the problem is unavoidable due to lack of space inside. The noise, though very weak in the Thomson CR61, was in my conditions of use still audible, so I mounted the transformer in an external box outside the clock and the problem is solved. Needless to say, the radio here is turned off completely when not in use, as it is logical to be done, unlike on the Sony’s, sold at double the price and more.
A remarkable safety feature of this model, is that the transformer has a 120°C thermal fuse built in. In case of overheating due to a short circuit, internally or externally to the transformer, it interrupts the AC supply. A very good feature for a device that stays plugged in all the time.
I modded the clock radio so that I can keep the seconds displayed permanently. I added only a switch which keeps the “Sleep” button pressed. If you keep the “Alarm” button pressed instead, the alarm will not ring,
if the button Is pressed during the alarm time. This applies to the clocks model which have not a separated “Alarm reset” button.
I have added also 2 LEDs that light the indicator of the radio scale, when the radio is switched on.
Finally, I promised myself that this will be my last clock radio and I will never threw it away! It is so well made and functional to me, that I bought other 3 pieces of the same model as replacement, to be sure it will last forever.
The modern clock radios
The modern clock radios in year 2023, also the most cheap models with LED display, are made with a PLL tuner made with SDR technology. There is no more mixer, intermediate frequency, etc… The radio frequency is directly sampled and completely digitally processed and demodulated. The processor unit has 10 or 20 memories for the stations. Cool, but it is made just to save the costs of the variable capacitor and other components. Like all the cheap SDR tuner, the have very low selectivity, low sensitivity and low audio quality.
Since they use a PLL tuner and a digital processor unit, a quartz oscillator is present in the circuit, to let the microprocessor and PLL work. This means also that the clock is quartz based, differently than the clocks made with LM8560.
But above all, they are all Chinese garbage electronic products. They will not last 30-40 years or more like many clock radios made in the ’80s, ’90s and early 2000s do.
Therefore, if you have a clock radio with the legendary LM8560 inside, keep it!
I bought one of those modern cheap clock radios, just to see what there is inside.
iCES ICR-210 (22€ in year 2023)
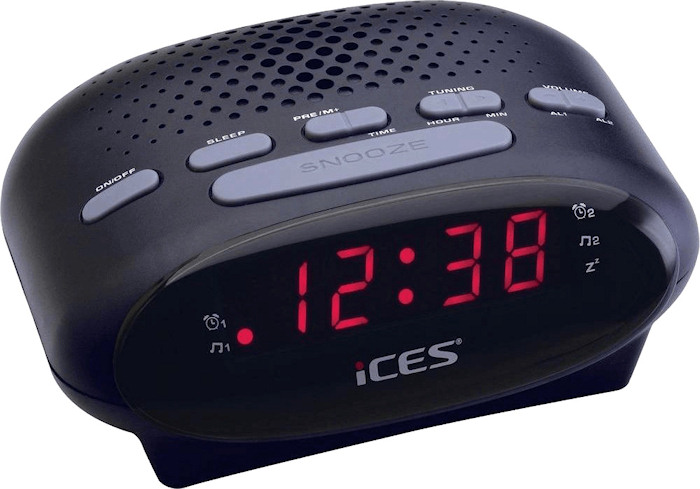
It looks fine, but the audio quality is poor. It has a very cheap digital SDR tuner. The quality of the tuner is quite poor too. The 10 memories for the radio stations are not comfortable to manage. The clock can’t display seconds, but it has 2 alarm times.
And… there is nothing inside!

It is not a clock with radio. It is a display with integrated clock and radio. 3 ICs mounted on a mini board, with a bunch of SMD components. That’s all! If the display or the clock IC fails, you have to throw away al.
The IC on the left is the IC of the radio (used only for FM on this model, to save the cost of the AM antenna). The square chip in the middle is the IC of the clock. There is nothing printed on it. Probably it is a programmed microcontroller, with integrated memory. The IC on the right is the audio amplifier.
If they were all good components, a such device should last forever (excluding the life of the flash memory, if the memory if of flash type). But welcome in the capitalism and in the reign of the infinite growth!
If you read the customer reviews of it, many users complain failures after 2 or 3 months, even on multiple pieces of the same model! About the display, radio, or audio, always the same failures. It indicates a real low quality of the components and a clear design based on programmed obsolescence.
The only good note. When disconnected from the AC power it sucks almost no current from the 3V (2xAAA size) backups battery. Only 4µA! It means that you can leave it unplugged for the whole time and plug it only when you need it. Being a quartz clock, it will not run faster or slower than when it is powered by the AC.
On the back side there is finally the quartz, which generates the clock frequency for the micro controller. But now it is too late for my wish from the ’80s about a quartz clock radio. Now I prefer the eternal LM8560…
Some LM8560 manufacturers:
| Designation | Manufacturer | Notes |
| SC8560 | Silanic (Silan Integrated Cicuits), China | Still produced in 2023? Mounted in the Thomson CR61 and in some Watson clock radios. It looks to be of good quality. |
| SP8560 | Si-Power (Silicon Power Micro-Electronics), China |
Mounted in some Chinese garbage clock radios. Quality unknown. |
| IL8560 | BMS – Belmicrosystems (INTEGRAL JSC), Belarus |
Quality unknown. |
| NTE2062 | NTE Electronics, USA | It looks to be still in production in 2023. Quality unknown. |
| LM8560 | UTC (Unisonic Technologies), China. | Still produced in 2023? Quality unknown, but supposedly good. |
| LM8560 | ? | Fake LM8560 made by unknown Chinese manufacturers. Quality unknown. Still in production. |
| W8560 | ? | Unknown manufacturer from the 1990 years. Likely discontinued. |
| TMS3450NL | Texas Instruments | Discontinued |
| LM8560 | Sanyo, Japan | Original by Sanyo. Discontinued. |
Similar ICs and alternatives IC for hobbyists
| Designation | |
| LM8365 | It can drive standard 7-segments common cathode LED displays. 2 alarm times. It has a dedicated pin to display seconds. |
| LM8360 LM8361 NTE2060 NTE2061 |
It can drive standard 7-segments common cathode LED displays. 1alarm time. It has a dedicated pin to display seconds. “Fast” and “Slow” speed set buttons. |
| LM8362 | It can drive standard 7-segments common cathode LED displays. 1alarm time. It has a dedicated pin to display seconds. “Fast” and “Slow” speed set buttons. |
| LM8363 | It can drive standard 7-segments common cathode LED displays. 2 alarm times. It has a dedicated pin to display seconds. Calendar with month/day. |
| LC85632 | 2 alarm times. It can’t display seconds. Calendar with month/day. Dimmer function for the display. Made for duplex display. |
| LM8562 | 2 alarm times. It can display seconds. “Fast” and “Slow” speed set buttons. Made for duplex display. |