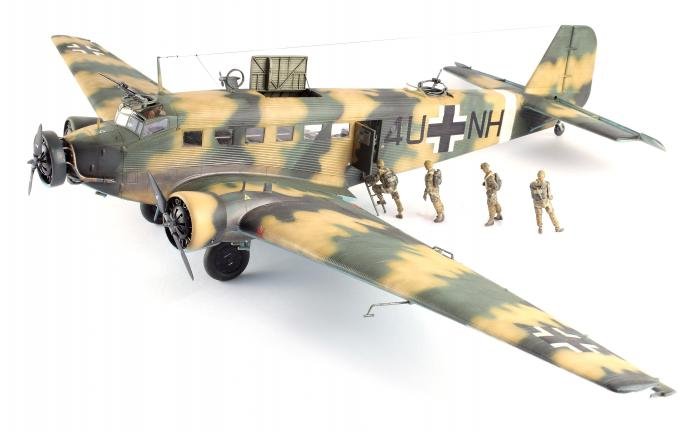
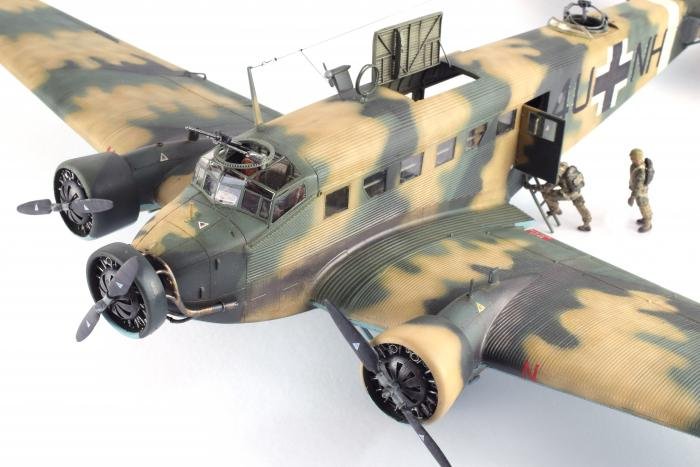
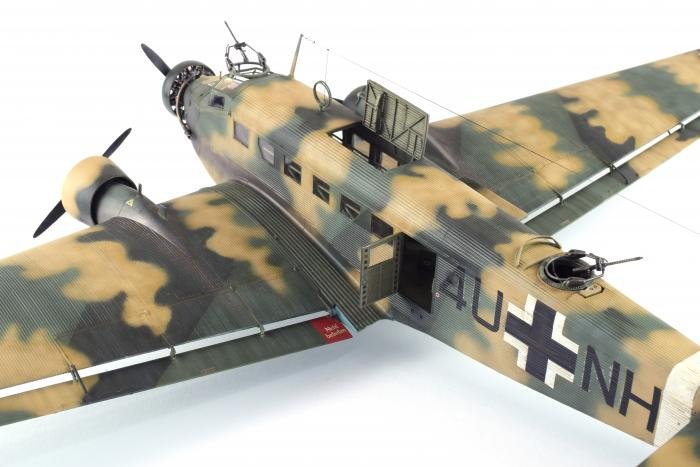
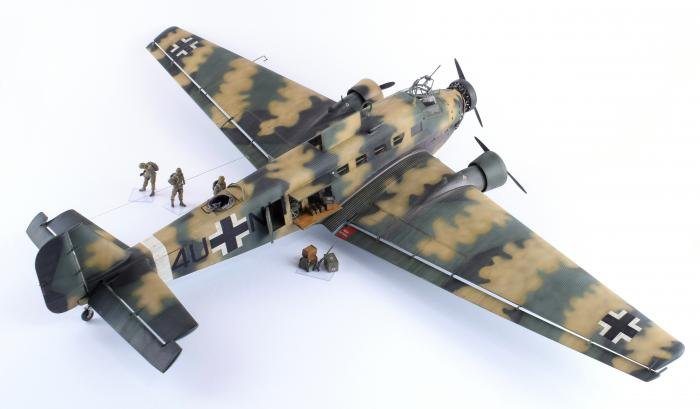
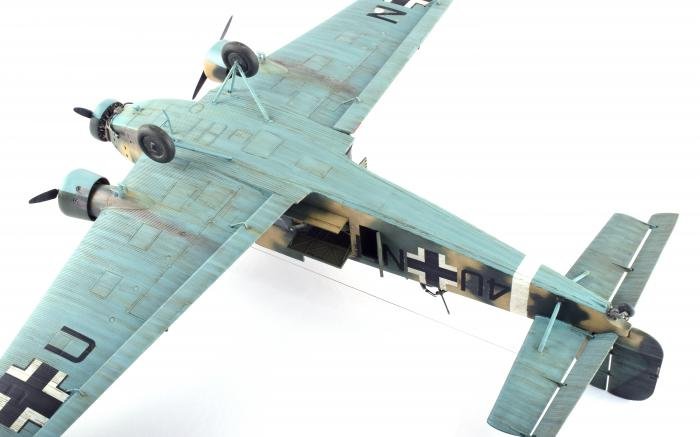
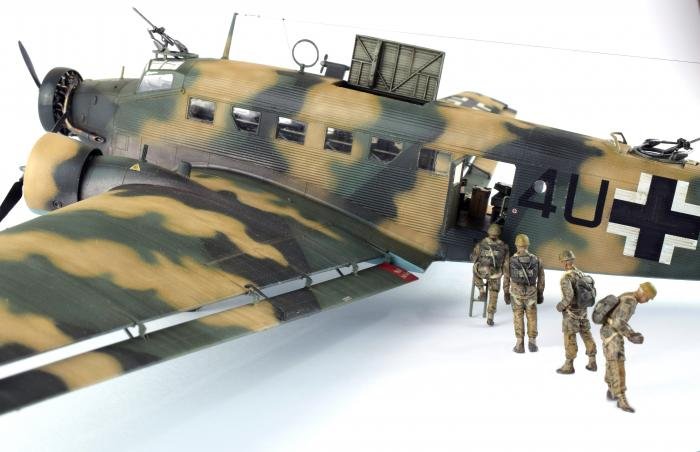
Richard Spreckley uses Revell’s 1/48 kit of the Junkers Ju 52/3mg4e to build a quarter-scale model of a type that served in Libya, North Africa, during 1943.
Junkers’ Ju 52/3m was developed in the early 1930s, and despite its age became the backbone of the German military transport fleet, specialising in heavy lift transport, deploying paratroopers in all theatres and as a passenger aircraft.
Nearly 5,000 were built between 1930-52 (its later service was as a passenger airliner for several national carriers). Revell’s kit depicted the standard military transport version – its most striking feature was the three BMW 132A-3 radial engines and its corrugated ‘skin’, which provided unprecedented strength. The type proved itself in locations ranging from the arctic to the desert and could carry 18 soldiers or 12 stretchers in a medical role. Its side-loading doors plus two personnel and bomb-bay doors (a genuine, if surprising feature) allowed varying sizes of cargo to be loaded on the ground and released either while airborne or having landed at a destination. However, the North African campaign featured the aircrafts’ heaviest losses in combat against Allied forces; in one day alone, 24 of the type were shot down.
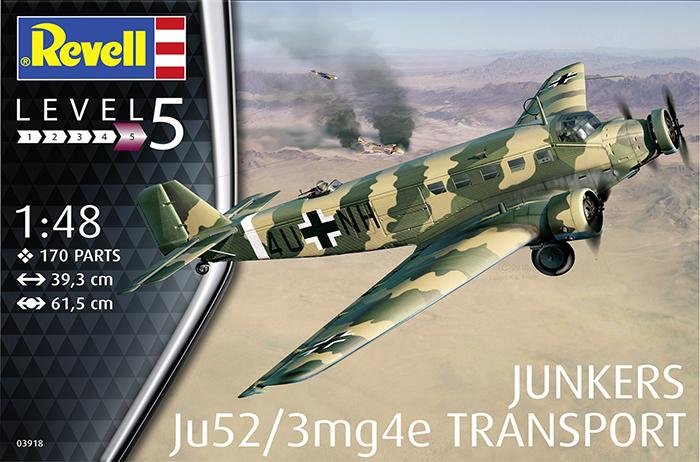
| MODEL SPEC | |
|---|---|
| Junkers Ju52/3mg43 Transport | |
| By: | Revell |
| Stock code: | 03918 |
| Scale: | 1/48 |
| Price: | €49.99 |
| Available from: | www.revell.de/en |
Styrene contents
This is a reasonably large aircraft in 1/48 scale, and this was reflected in the box size. There were just five runners in total; four large frames of off-white plastic and one clear example. My first impressions were that as a two-decade old tooling it was a basic offering, in contrast to Revell marketing it as one of its ‘Level 5’ kits (denoting the highest complexity level from this manufacturer). On closer inspection, though, the detail for an injection-moulded kit appeared sublime, especially in the cockpit and interior. Engines and exhaust systems were also well-moulded renditions of their complex shapes, and another impressive feature was the crisp, corrugated effect on the exterior surfaces.
The kit provided two markings options, one for a Europe-BMW deployed airframe and one based in North Africa; the latter scheme stood out with temporary desert camouflage superimposed over the standard splinter scheme and this was chosen for the build. There were no aircrew included in this kit, but a neat addition was four Fallschirmjäger (paratrooper) figures in various poses – these were ideal for adding a sense of scale and visual interest.
The new-style Revell instructions were well presented and easy to follow, but a first glance revealed the sole issue; the lack of painting guidance for the figures. The standard uniform for the European theatre of operations was given, but no advice was provided for North African troops.
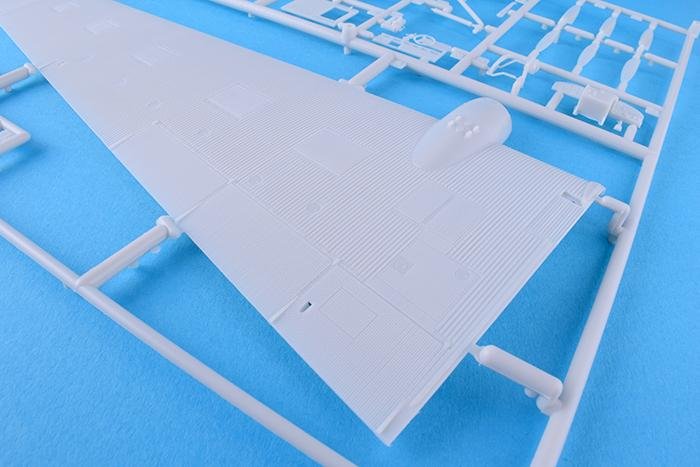
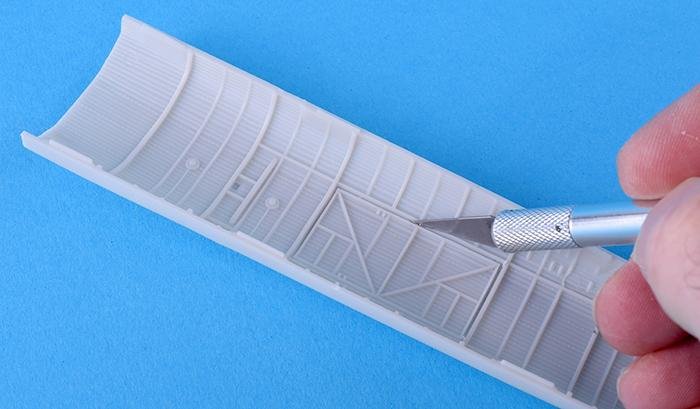
Above: For a 20-year-old moulding, the detail on the styrene was crisp and replicated the complex corrugated surfaces beautifully.
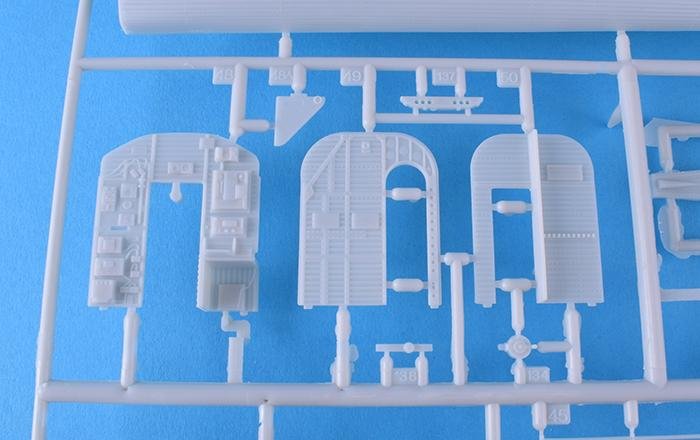
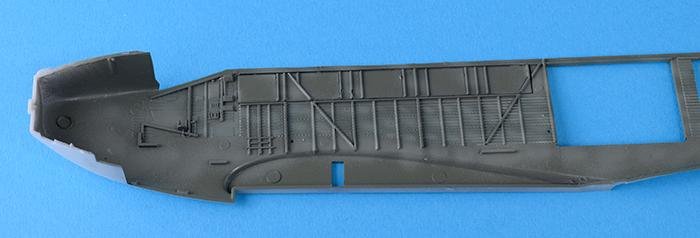
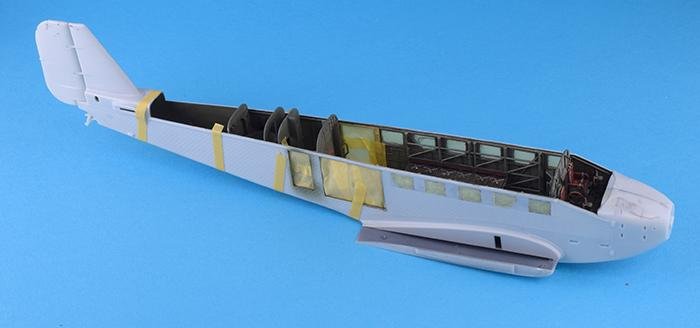
Above: Cockpit and troop/cargo areas were large and highly visible, and these featured convincing detail on the bulkheads.
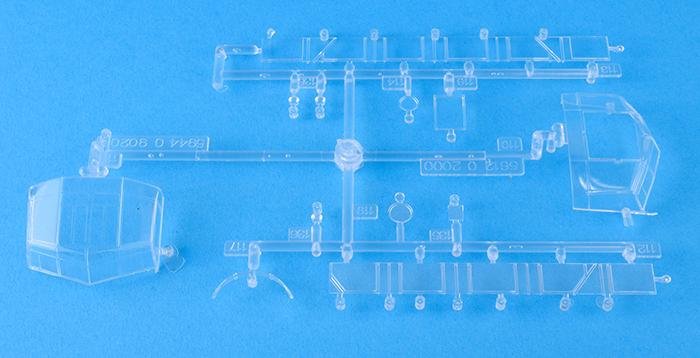
Above: A small transparent frame provided the clear parts, including a pair of cockpit framing styles, passenger windows and interior light covers.
Above: Revell’s cargo/troop-carrying area design meant the hatches and doors could be cut and removed easily – this would allow better visual access to the interior.
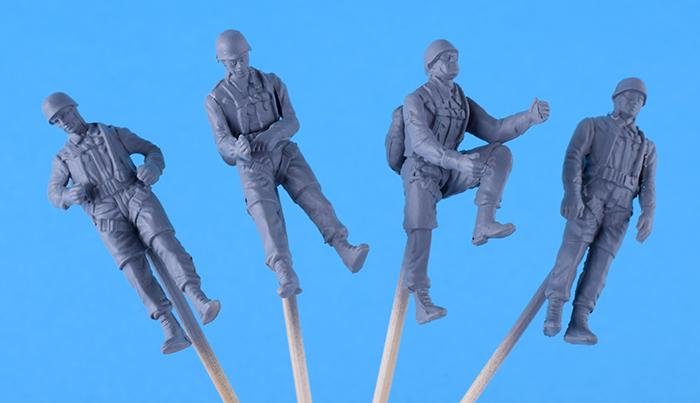
Above: Four neatly detailed Fallschirmjäger (paratroopers) figures were each moulded in a different pose and formed ideal material to enhance the interest and sense of scale.
All in the detail
Prior to starting construction, it was essential the instructions and parts were studied carefully, as there were several ‘interesting’ elements provided that weren’t clear in the former – these could add another dimension to this model if desired.
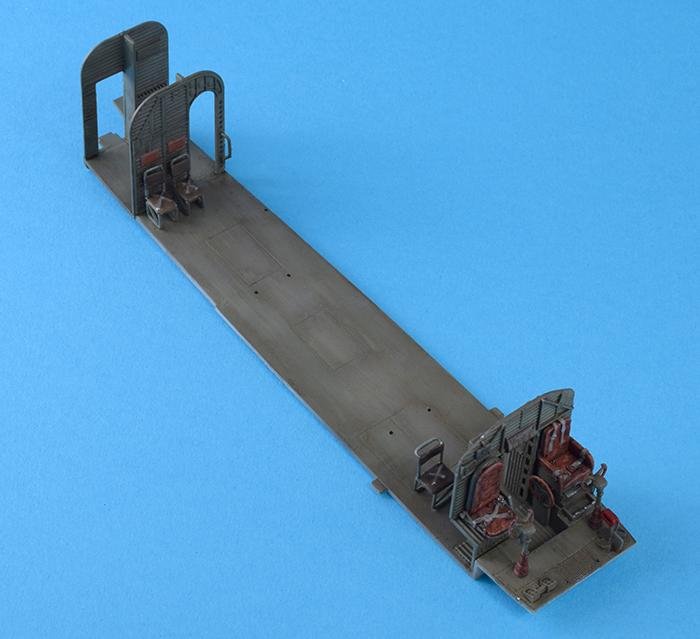
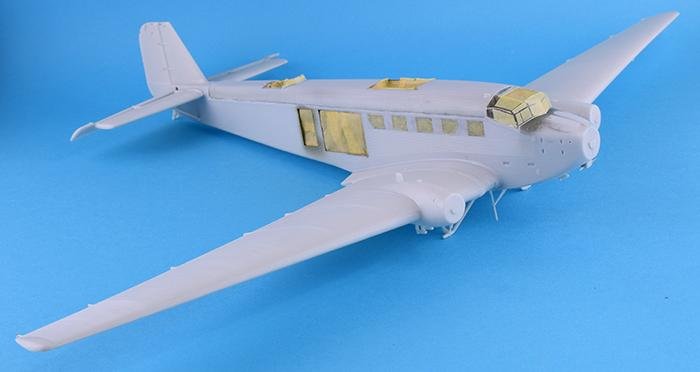
The interior was a model in itself; mouldings were crisp and the detail, especially around the cockpit, radio station, rear bulkhead and rear gun emplacement, appeared excellent. On most models of this type, these features would be hidden when the fuselage was closed, but Revell included an option to leave the ceiling/roof unattached, allowing it to be removed to expose the innards. Unfortunately, the fit, although good, would potentially make the final model appear unfinished. A viable alternative – yet not shown in the instructions – was the removal of the upper fuselage hatch plus the starboard loading and cargo doors, all of which were moulded to allow them to be separated. It was therefore decided to take advantage of this to showcase the interior.
The kit also featured two types of clear glazing, one full canopy and another with the top section removed – intended for the installation of a forward defensive machine gun – as another way of revealing cockpit detail, and this option was exercised. With scope for the interior to be viewable from various angles, many of the internal components were painted prior to assembly, including the seating and supporting frameworks that ran along the inside of the fuselage. If the latter were assembled and then painted, gaps in coverage would be clearly visible through the aircraft’s numerous windows.
The only items replaced with aftermarket products were the pilot/co-pilot seats – Quickboost’s QB 48 568 (www.quickboost.net) was a highly detailed set that complemented the kit’s features. Due to their resin construction, the components were washed in warm soapy water and dried to remove any curing agent, then all parts were primed with Ultimate Modelling Products’ UMP027 Grey Primer (www.umpretail.com). This was followed by the interior colour, which research revealed was replicated via a mix of Vallejo’s 71.093 Field Green FS 39404 – now known as NATO Green FS 39404 – and 71.307 BS Medium Sea Grey BS637 (www.creativemodels.co.uk). This custom shade was used to simulate high wear, and the flooring and access ways around the bulkheads were then post-shaded, with the interior colour lightened via a drop of Hataka’s HTK-A101 Traffic White (www.hataka-hobby.com).
The radio station, wiring and canvas curtain on the cockpit doorway received 71.251 NATO Black, 71.078 Yellow RLM04 and 70.314 Canvas, respectively, and to further accentuate these areas 77.702 Duraluminium was then dry-brushed on appropriate edges and surfaces. Seat harnesses were painted 71.119 White Grey, while the lovely instrument panel detail was prepared and painted with 71.054 Dark Grey Blue and then sealed with 70.510 Gloss Varnish – along with all the other interior parts. A decal was then applied to the instrument panel and Micro Sol (www.microscale.com) added to encourage it to conform to the raised detail. Vallejo’s 76.513 Dark Brown Model Wash accentuated the moulded detail; this was allowed to dry partially before any excess was removed with damp cotton pads/buds.
Above: After a primer coat, the base colour was airbrushed onto the interior, followed by a post-shade to accentuate the moulded relief.
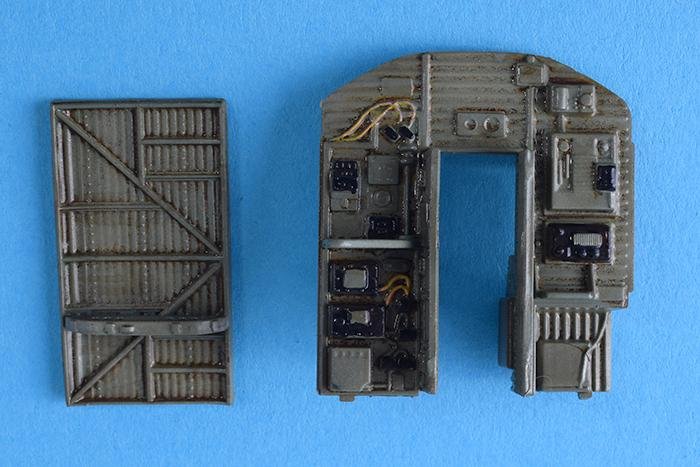
Above: Integrally moulded airframe equipment was hand-painted, sealed with a gloss varnish and then treated with a dark brown wash.
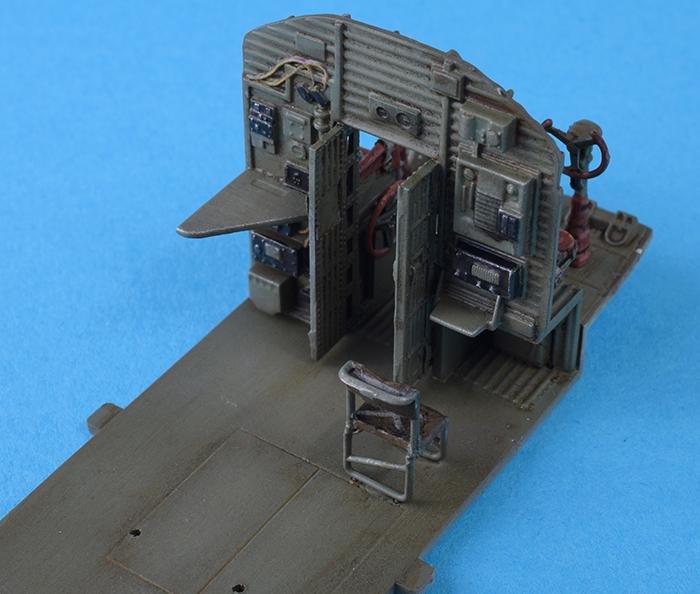
Above and below: Kit components provided excellent detail in the interior, which was enhanced with the aftermarket resin pilot seats. Once painted, these added considerable visual interest to the area.

Above: A post-shade plus a dry-brushed application of metallic shades and a dark brown wash – followed by matt varnish – was used to complete internal floor and bulkhead weathering.
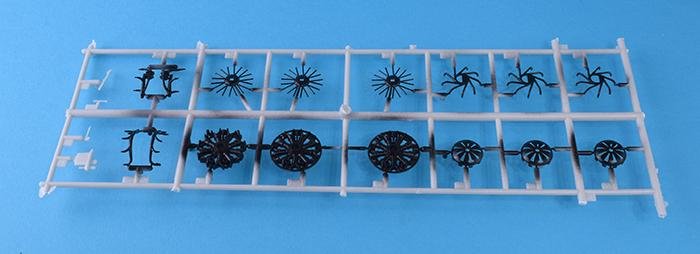
Above: All engine parts were kept on the runner for ease of painting – a gloss black primer was applied in preparation for metallic tones.
Above: The fuselage halves and lower hull sections featured exceptional fit – especially impressive given their size and the age of the moulding.
The fuselage halves were then attended to, prior to the final assembly of the interior. All glazing was dipped in AK Interactive’s AK893 Glass Coat Gauzy Agent (www.ak-interactive.com), which gave a crystal-clear finish and disguised any imperfections or blemishes in the clear parts. Once dry, they were attached to the fuselage halves and covered with the aid of Eduard’s EX655 Ju 52 mask set. The same painting and weathering processes as the interior were then applied to the fuselage ceiling, doors and hatches, which had been removed previously. All elements were then assembled and attached to one airframe half, after which 70.520 Matt Varnish was employed to seal everything. There were several notable elements, such as the lights on the aircraft’s roof, which were supplied with beautifully moulded clear plastic covers. Unfortunately, there was minimal information of what colour these were, so a best guess was used, and they were treated with 71.003 Red RLM23 before adding the transparent shrouds.
Forward planning meant the engines, exhausts, guns and associated mounting systems were sprayed with 73.660 Surface Primer Gloss Black in readiness for their metallic coverings. Similarly, the wheels were assembled and treated with UMP027 Grey Primer, along with the Fallschirmjäger figures, propellers and engine cowlings. The inside of these last items were then painted as per the fuselage interior, while the wheels received 71.251 NATO Black – these were then masked via custom-sized pieces of tape made with a silhouette cutter and painted Tamiya XF-85 Rubber Black (www.hobbyco.net).
The kit propellers – which in my view didn’t seem large enough – were coloured with 71.057 Black, followed by 71.251 NATO Black, which was airbrushed lightly across the axis of the blades to add depth. Hubs were then brush-painted with 71.050 Light Grey, and 77.701 Aluminium was dry-brushed on the propeller edges and the wheel rims to simulate wear. Last, a wash of 76.522 Desert Dust was added to the wheels to reflect the sandy conditions in which this aircraft would have operated.
The lower half of the starboard cargo hatch featured a wood finish to assist loading/unloading cargo – here, an Uschi van der Rosten 1016 Aircraft Interior Textures decal (www.uschivdr.com) was applied to achieve this appearance. This was then sealed with gloss varnish and treated to a dark brown wash.
The engines then received 77.701 Aluminium with the cylinder heads brush-painted with 71.706 White Aluminium, followed by 77.712 Steel for the ignition wires and 77.723 Exhaust Manifold on the exhaust systems. All three powerplants were sealed with 26.657 Metal Gloss Varnish, with a 76.517 Dark Grey wash to accentuate the detail, after which the exhausts were added.
Above: An important aspect to remember was that the instrument coaming required painting after the fuselage halves were married. Here, it has received the interior shade.
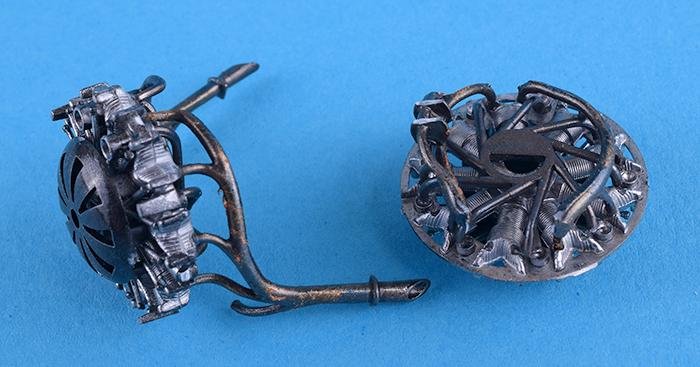
Above: Revell’s styrene components displayed excellent moulded detail, extending to the BMW 132A-3 engines.
Above: Very little filler was required on this build – a testament to how well the parts fitted together.
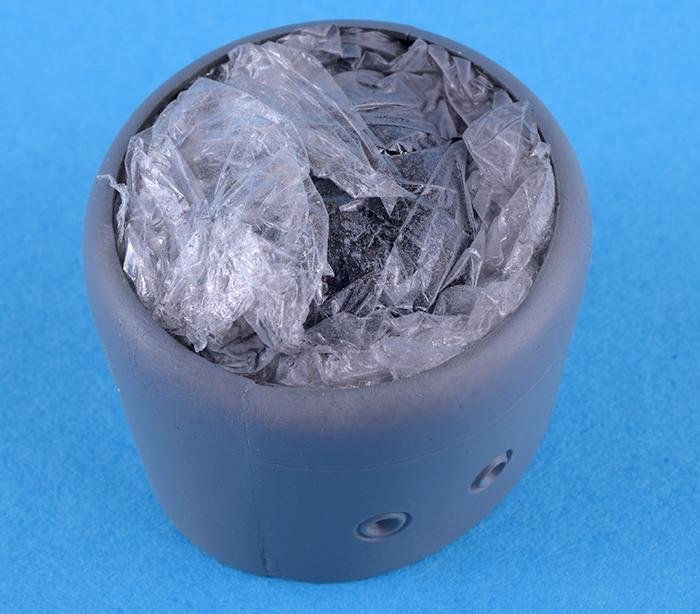
Above: Ordinary clingfilm is an excellent medium for masking, especially to fill internal spaces such as on the engine cowlings.
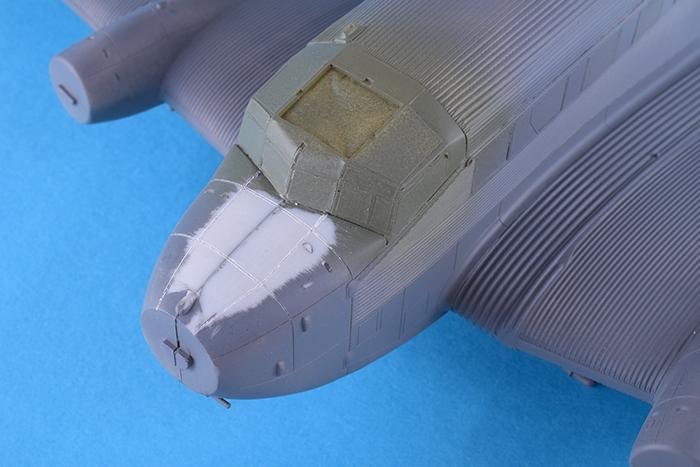
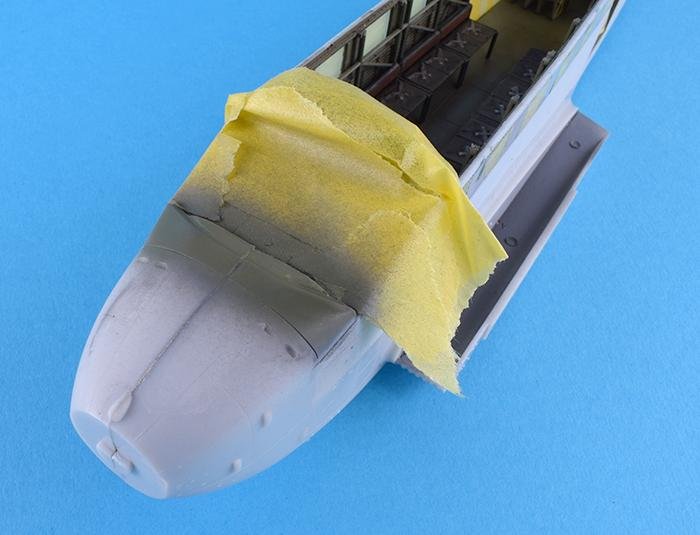
Above: After minor fettling and sanding to remove a seam, the nose area detail was re-scribed. Note, the clear part was also painted with the interior shade prior to priming.
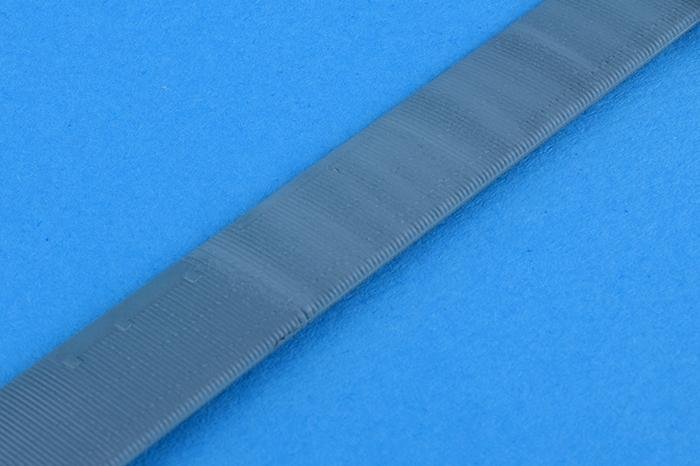
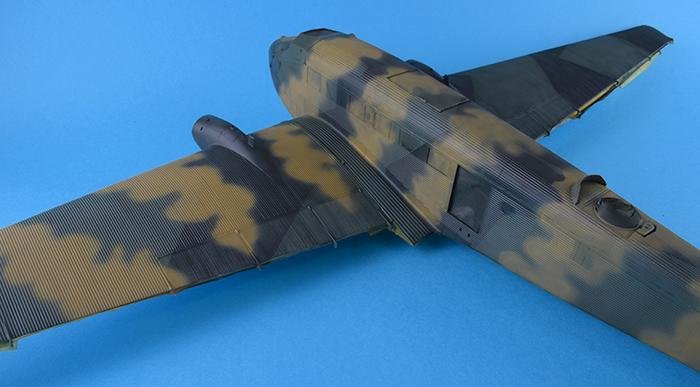
Above: Corrugated surfaces were accentuated for excellent contrast effects; the underside colour was post-shaded to enhance the illusion of depth.
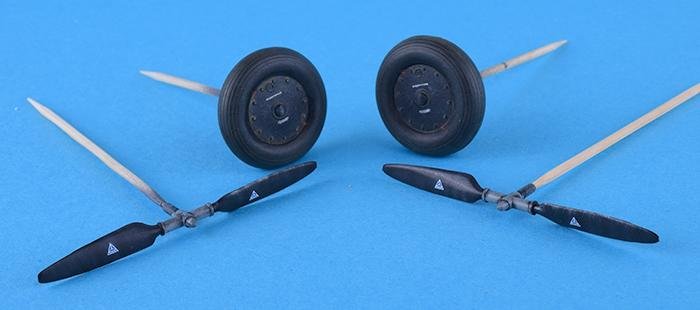
Above: The mainwheels featured lovely, if subtle detailing – this was highlighted with dry-brushing techniques and a sand-coloured wash.
Fallschirmjäger and cargo
The paratroopers were set in different poses, representing a four-man ‘stick’ waiting to board the aircraft. As this build depicted North African operations, it was important the figures reflected the camouflage scheme for that theatre. Research was undertaken to source descriptions and photos of the relevant uniform and equipment used by Fallschirmjäger troops during that period.
Quarter-scale figures are minute, and a balance must be struck to replicate the complex camouflage patterns with the amount of detailed painting used. The aim was to produce an impression of the uniforms using 71.025 Dark Yellow, 71.093 Field Green, 71.095 Pale Green plus Hataka’s A017 Dark Green. After taking advice from a figure modeller, the paratroopers received a base colour of 71.028 Sand Yellow, then the camouflaged jackets and helmets were brush-painted.
Highlights were then dry-brushed with a lightened mix of the base colour – achieved by adding a hint of A101 White. LifeColor flesh tones UA 709 and UA 711 (www.airbrushes.com) were employed for the faces, after which the figures were sealed with 70.510 Gloss Varnish and given a 76.513 Dark Brown wash, before 70.520 Matt Varnish was used to protect the finish. They were set on 20-thou (0.5mm) clear plastic sheet to prevent them from falling over – this also allow them to be displayed in different configurations.
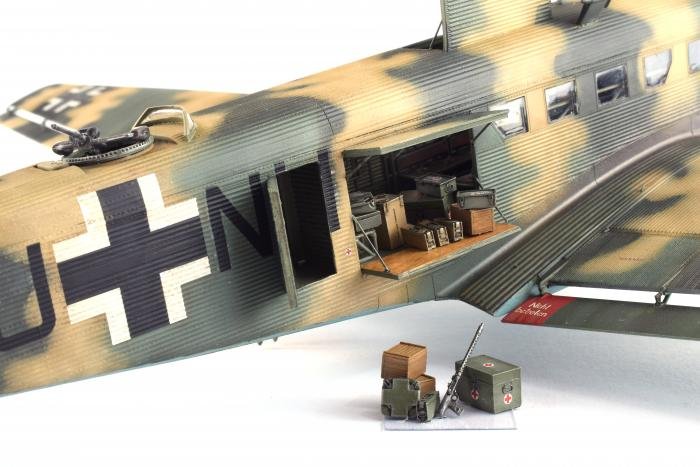
The Ju 52’s versatility meant it could carry cargo alongside paratroopers – an ideal feature with this build featuring both the top hatch and side cargo doors open. Unfortunately, there was nothing supplied to represent such a load, but Plus Model’s set 4023 Ammunition and Medical Aid Containers - Germany WW II (www.plusmodel.cz) contained a variety of items, which included ammunition boxes, medical equipment and crates. These were painted randomly in the custom-mixed interior green colour, 71.028 Sand Yellow and 71.077 Wood. Metal containers were then dry-brushed with 77.701 Aluminium, sealed with a gloss varnish and given a dark grey wash. The medical items had decals applied before the final wash process, after which they were finished with 70.520 Matt Varnish.
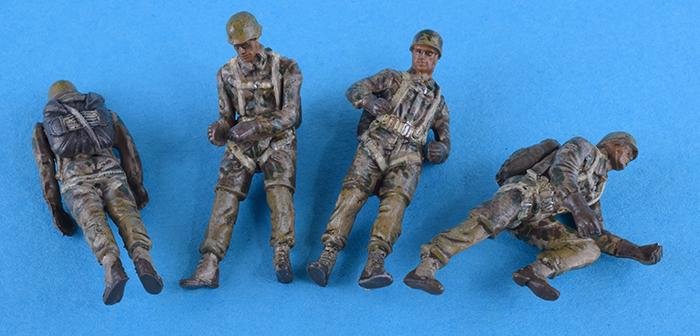
Above: The figures were painted in a representation of North African uniforms, which were determined after a study of reference photos as this isn’t detailed in the instructions.
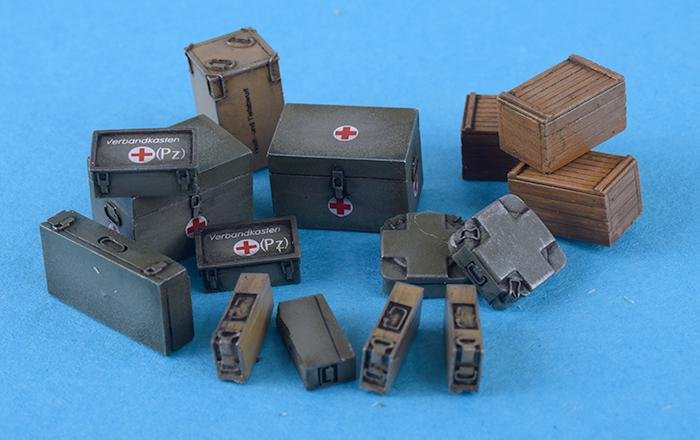
Above: Opening the loading hatches to the airframe invited extra detailing – Plus Model provided standard medical and ammunition-specific boxes of varying sizes.
Aircraft assembly
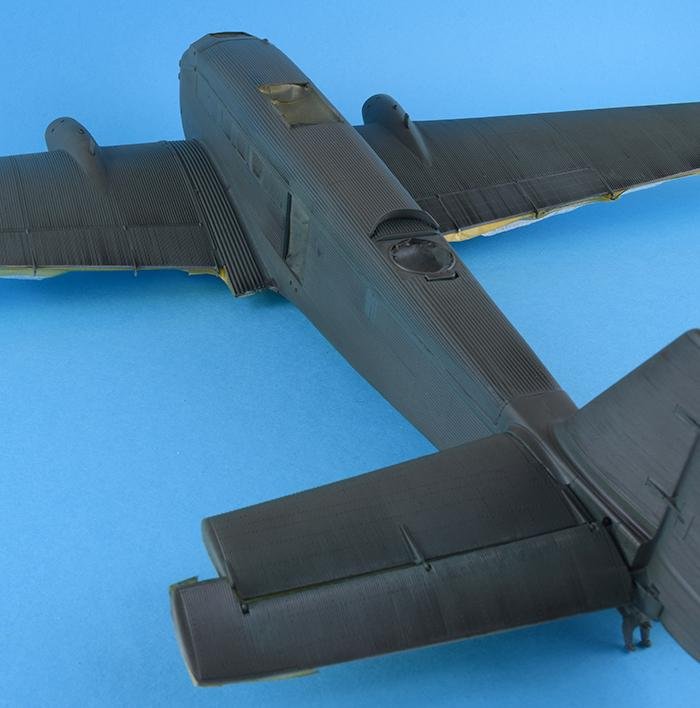
Construction of the airframe and wings was straightforward, and for a 20-year-old kit most areas featured a tight fit. Revell designed this kit with a section of removable upper fuselage plus the underside section also included wing stubs – as a result the airframe halves married well, but the long structure didn’t feel very sturdy.
Having already removed all the aircraft’s access doors, the main elements were attached permanently. The Ju 52’s wingspan appears huge and the detail visible across this large section continued to excel, with the corrugated effect really ‘standing out’ and appearing in scale to a ‘mark-one eyeball’. Just a single issue was encountered, and that was a slight warping on the engine nacelles, which required taping and clamping to conform to the correct shape.
An identifying feature of the Ju 52’s wings was the stepped ailerons, in model form these were secured at several points along the upper wing. They were left off the aircraft until they were painted, and during the build were found to be fragile – several were broken due to handling – – fortunately, all were recovered and re-attached. Elevators were posed offset to add extra dynamism to the finished model.
The lower fuselage joins were particularly impressive as this area can often cause modellers stressful moments, but this was not the case for this kit; the fairly complex boxed and stepped shape at the nose fitted like a glove and required no fettling or filler. All antenna and small details were omitted at this stage to ensure there was an unobstructed surface to assist in the masking for the splinter camouflage.
Desert style
Hataka’s splendid HTK-AS02 Early Luftwaffe paint set provided colour matches to the splinter pattern required for this build; in this case A017 Dark Green (RLM71) and A015 Black-Green (RLM70). Vallejo’s 71.025 Dark Yellow was selected for the temporary desert scheme, which was then applied over the angular ‘splinter’ camouflage.
All fuselage openings were masked before UMP027 Grey Primer was applied. A 71.054 Dark Grey Blue pre-shade was used on the lower fuselage, followed by 71.008 Pale Blue, which was sprayed lightly to build paint layers gradually. White was then added to the base colour for a post-shade, adding contrast and depth.
The splinter pattern was copied from the European option; A017 Dark Green (RLM71) was applied after the lower fuselage was masked and allowed to cure for 24 hours. There was concern the corrugated surfaces would cause problems in achieving the sharp straight lines of the standard Luftwaffe camouflage, but these fears were unfounded as the masking proved sufficient to achieve the desired effect using A017 Black Green. Due to the size of the aircraft – and the way the splinter scheme fell between the wings and fuselage sections – the masking process was undertaken in stages, covering the mainplanes first. As before, post-shading was then completed by lightening the base colours with white.
The biggest dilemma was how to apply the temporary desert scheme over the splinter pattern – spraying a light colour over a dark pattern is fraught with risk of overspray and ‘splatter’. Consideration was given to masking the complex shapes over the European scheme, but this would have produced a ‘hard’ demarcation and, having conducted research, it was clear the desert scheme wasn’t precise in its application. Hence, a ‘rough and ready’ finish was achieved using freehand airbrushing with a cotton bud immediately at hand to remove any obvious excess. Initially, the impression was that the base colour, 71.025 Dark Yellow, overpowered the post-shaded European theatre camouflage, so two lightened applications of this tone were used to mute the sandy hues. This had the desired effect, blending the two camouflage schemes, so the final appendages and antenna were duly pre-painted and attached.
Above: The base coat for the splinter pattern was applied and left to dry for 24 hours before masking.
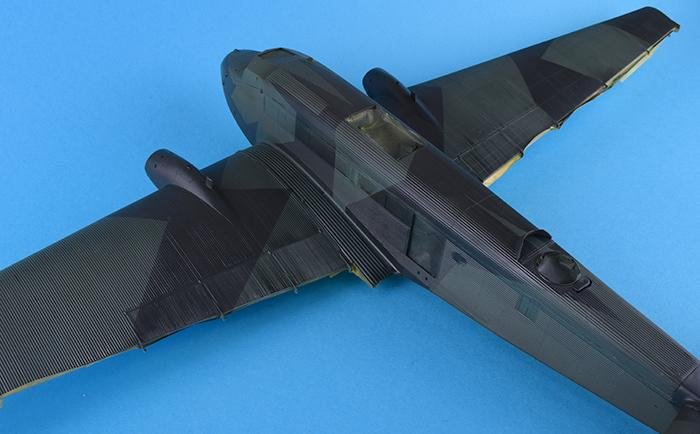
Above: Masking was conducted in stages due to the complexity of the scheme – once completed, the camouflage received post-shading effects before the temporary desert livery was applied.
A gloss varnish was sprayed in preparation for decaling, but there was considerable apprehension that the corrugated effect would warp, distort and/or prevent the decals from settling properly. It certainly presented a risk, especially for the large Balkenkreuz on the wing and fuselage. The decals were well printed and the carrier film didn’t appear overly thick, although as on most modern German kits from Revell, swastikas for the tail were missing – these were sourced from aftermarket products.
The potential for silvering was also high due to the uneven surfaces, so to reduce this much of the backing sheet was removed prior to applying the decals. A damp piece of kitchen paper was used to press each marking into position and, once satisfied with the placement, a generous amount of Micro Sol was added. The decals behaved wonderfully and, with the assistance of the fixative, conformed to the complex shapes.
Further weathering was required prior to adding the engines; 71.119 Grey White was used for exhaust staining, with an overspray of 77.713 Jet Exhaust. Streaks of 71.074 Radome Tan (now labelled Beige) and 71.028 Sand Yellow were applied to the lower fuselage and wings, along with extremely pale mixes of the upper and lower camouflage colours. Chipping effects were achieved via AK10046 Metallic Effects weathering pencils, while oil staining was created with Tamiya’s 87088 Weathering Master Set D. Once completed, all access doors and cargo were secured to finish the build – the final stage was to apply a thin coat of matt varnish over the whole model.
Above: A risk when applying the 71.025 Dark Yellow was overspray – masking would result in a hard demarcation, so care was taken to set the airbrush at 12 psi (0.82 bar).
Above: There was concern the clear backing of the decals would silver when applied to the corrugated surface, hence this was removed to minimise any issues.
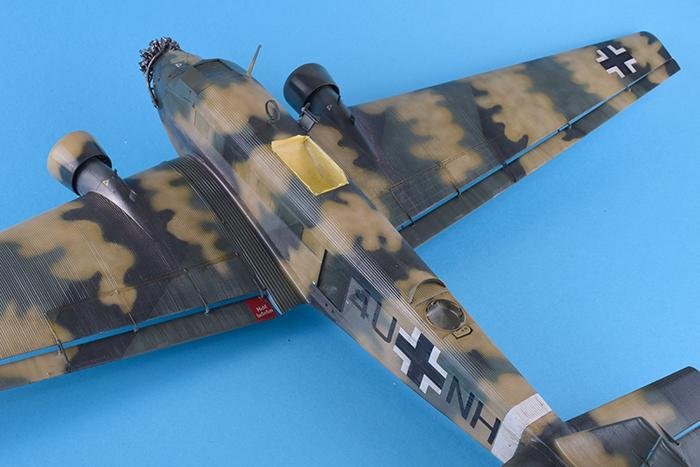
Above: A significant amount of decal fixative was required to ensure the markings conformed to the complex fuselage surface and shape.
On reflection
For its age, Revell’s 1/48 Junkers Ju 52/3mg4e Transport is superb the standard kit detail and quality of engineering provides a product that allows modellers of any skill level the opportunity to produce an excellent replica. It’s very forgiving and presents a foundation for adding further elements which could even extend to a full diorama, although this does highlight one issue – the main drawback to this kit: its size. Once built, Revell’s Ju 52 deserves a display space that will do it justice, but this shouldn’t be the overriding factor when considering this kit; it certainly punches above its weight on build quality and value for money.