Welcome back! This week I’m sharing more details on my Lulu build, which I debuted at Anime North Texas last weekend. In my last post, I talked mostly about the upper half of the costume, so this week I’ll be getting into the lower half of this build.

Skirt and sleeves: There’s a lot of debate as to how Lulu’s “dress” is constructed. A lot of cosplayers seem to think that Lulu is actually wearing an off-the-shoulder dress with a severely low cut back, which is held up by her corset. I thought about taking this approach, but ultimately decided to just make a set of sleeves and separate skirt for easier storage and repairs. I used this material from Fabric.com.
To create the sleeves, I took a basic sleeve pattern piece and traced it off. From there, I held it up to my arm, cut off the top section, and slashed and spread the piece up to the very top of my pattern to create a bell shape. I used my hip ruler to trace off a clean curve. I tweaked the fit using a mock-up. The final piece is held up on my arm with silicone-backed elastic, though I need to make this snugger before I wear this costume again.
For the skirt, I turned to Kwik-Sew 3400. I blended the princess seams on the front and back of the pattern and then cut each piece off at the waist. To create the front, I held the piece up on myself and snipped it off a few inches below the lowest part of my hips. To finish the top edge of the skirt, I made a facing using my mock-up pieces and serged the bottom edges of the facing. The skirt closes with an invisible zipper.

I opted not to line these pieces, mostly out of concern for the sleeves. Since interior parts of the skirt and sleeves will be visible, I did finish them off with bias bound edges and top-stitched the seam allowances down to match the game artwork.

Helpful tutorials:
Estimated time: 7 hours

Lace: Oh… the lace. My original plan was to digitize everything for a super accurate costume. Then I quickly realized that I didn’t have: 1) the skills to complete this; 2) the time to learn; or, 3) the money to pay someone to do all the digitizing for me. Instead, I compromised. I picked up a fair amount of lace from cheeptrims.com in the Venetian lace and appliques section. These pieces I painted using Jacquard’s Dynaflow.

I also made a few lace embroidery pieces. For these, I purchased a set of floral lace files from emblibrary.com and used this tutorial on their website.

I did opt to commission Meow About Crafts for Lulu’s very notable lace pieces: the center front piece and the pinwheel pieces scattered throughout the base skirt. For the pinwheel pieces, I essentially treated them as patches. Once I stitched them out onto scrap pleather, I cut them out very close to the edge and then glued them onto skirt. For the center front piece, I stitched it directly onto the front of the skirt. That was an interesting experience, as I had to attempt to figure out how to do multi-hoop embroidery and pretty much failed. I covered my mistakes with extra lace, though I plan to correct this for my next wear.
I glued all the lace pieces to the skirt and sleeves using contact cement and e6000.
Helpful tutorials:
Estimated time: 25 hours (I made way more than I ultimately used)

Belts: Oh man, this was another crazy challenge. I didn’t want to kill myself over accuracy here, because that would have been a one-way ticket to crazy town. Instead, I raided thrift stores and found fairly close matches for belts. I grabbed anything that looked remotely usable, regardless of color or hideous buckle design. For belts that were funky colors or needed touch-ups, I painted them with Angelus leather paints.
From there, I laid out all my belts and created a frame work, using the opening on my crinoline as a guide. Once I had a frame of decent belts built up, I started gluing them again with contact cement. I added several layers, trying to keep with Lulu’s overall color scheme and patterns. The only belt I built myself was her iconic red belt, which I made from vinyl and leftover belts. There are about 40 belts total.
To attach the belts to the crinoline, I laid my glued belt piece face down on my craft table, then placed my crinoline on top of it. I used contact cement on the hoop bag and e6000 at all the cross joints and straps. Once everything was glued, I placed clamps and clothespins on everything and let it sit overnight. The result worked out quite well! I can jump, twist, and do all kinds of movement in the skirt now.
Helpful tutorials:
Estimated time: 7 hours
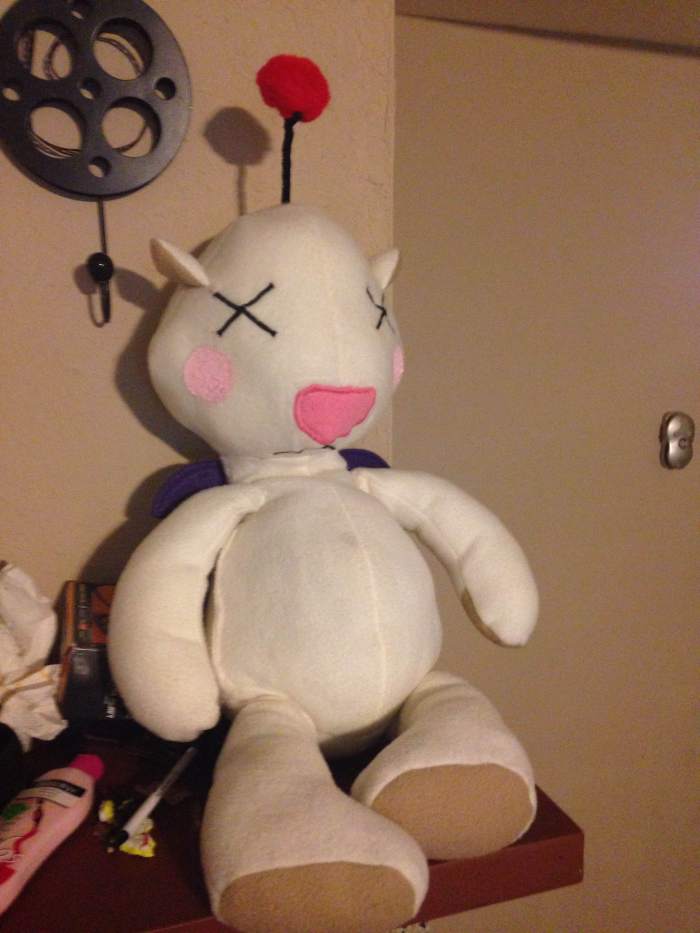
Moogle: This is the one part of my costume that I’m considering remaking before I rewear. I started this project based on Simplicity 5461. The pattern head was nowhere near big enough, so I drafted my own, which was also too small. I then drafted a 3rd head for my moogle, which worked out pretty well, but I still may go back and remake him. Thankfully, I did figure out how to do the bulk of the facial design on my sewing machine (sew the face front, sew on the details, then sew the rest of the head together), and I learned how to give a plush a skeleton for posing, which was helpful.
Helpful tutorials:
Estimated time: 20 hours

Wig: This piece was surprisingly time consuming. I picked up a black ponytail wig from EpicCosplay along with their long wefts. To create the base of the wig, I separated out chunks of wig hair around the enter wig for the braids. Once I separated out my pieces, I pulled the rest back into a high(ish) ponytail.
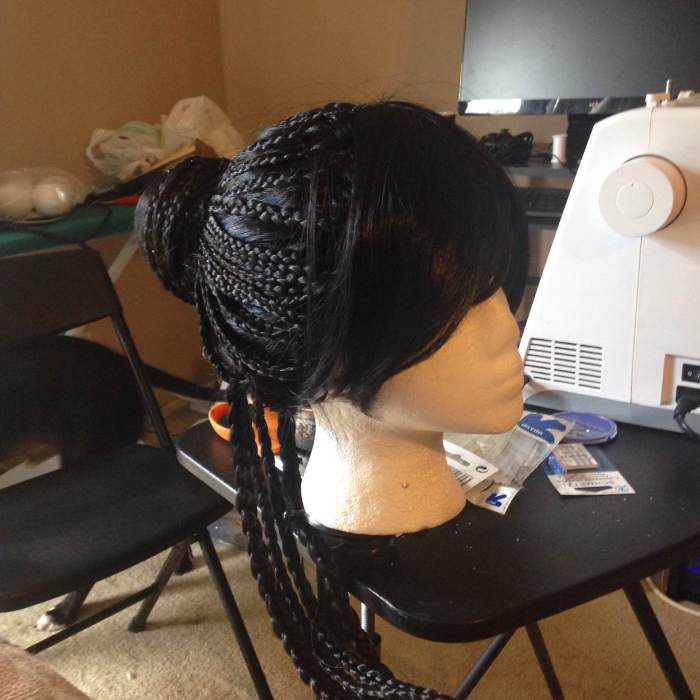
From there, I set about braiding ALL the rest of the hair (aside from the bangs) into 1″ chunks and pulling it back into the base pony. There were a few gaps where wefts were visible when I was complete, so I took the clip-in pony that came with the wig and harvested the wefts to fill in gaps. After I got all the exposed wefts covered, I stubbed the base pony and covered it with a pre-made bun from Arda. To give the bun a little more stability, I hallowed out a Styrofoam ball and used it as a base. The bun is hotglued to the wig and has extra support from bobby pins. I covered my work with extra braids made from pony weft scraps.

For the long braids in the back, I sewed the wefts onto some scrap black ribbon, then sewed the ribbon into wefts just underneath the bun. I separated them into four braids and added beads to the end. The chopsticks are held in place with hot glue.
Helpful tutorials:
Estimated time: 12 hours

Flame prop: This was a fun experiment with Worbla’s new transparent product. To create this, Callula and I cut out several flame shapes. I dyed them yellow and red(ish) using iDye Poly while Callula built a LED core for the center flame. SpaceCadet Cosplay molded the flames, and we used an undyed strip to wrap around my hand. Unfortunately, the switch we originally picked up didn’t work out, so we had to use a press button instead, which means I had to cover the button with tape at the con to keep the LED lit.
Helpful tutorials:
Estimated time: 5 hours

That about does it for this week’s post! Next time I’ll share some final details, thoughts, and hopefully lots of finished photos!

I LOVE how this came out!
I used the same leather from fabric.com twice and it’s so nice and easy to work with!
Thank you! Oh man, I love that fabric so much! It’s so nice and draped so well for this project. I’m kinda tempted to use the scraps for a vest!
This came out so incredibly! Love seeing the behind the scenes…you put so much work into your beautiful cosplays and it really shows!!
Thanks so much! This costume was definitely a labor of love.